
Diagnosing Garage Door Opener Motor Problems
Recognizing the Warning Signs of a Failing Motor
The silence is the first giveaway. A motor that once whirred to life now offers only a strained click, or worse, nothing at all. In a country where load-shedding has taught us the value of a reliable backup system, a garage door that refuses to cooperate is a small domestic tragedy. You stand there, remote in hand, pressing the button with increasing desperation, a ritual of hope followed by the same mechanical shrug.
Often, the problem is not a complete failure but a series of diminishing returns. The door moves slower than a Monday morning, or it stops halfway, as if reconsidering its life choices. Other signs are more theatrical: a grinding groan like a hungry beast, or a sudden shudder that rattles the pots in the kitchen. When you notice the motor running but the door staying put, you are dealing with gear wear or a stripped sprocket.
– A high-pitched squeal during operation, which points to worn-out bearings.
– The motor hums but the door remains immobile, a classic sign of a failed capacitor or gears.
– The door reverses immediately after hitting the floor, indicating a faulty travel limit switch.
These warning signs are the motor’s polite way of requesting your attention before it goes on strike permanently. Ignoring the subtle cues, such as an increasingly sluggish response or a remote that only works when you stand directly underneath it, leads to the inevitable moment of total system failure. At that point, the manual release cord becomes your only friend, and your vehicle is relegated to the driveway until you find a professional to repair garage door motor issues. Heeding these quirks early can save you from the exasperating ordeal of becoming a prisoner of your own garage.
Testing Power Supply and Electrical Connections
Before you summon a technician to repair garage door motor problems, the diagnosis often begins at the breaker box. A tripped circuit or a blown fuse mimics every symptom of a dead motor, and I have watched homeowners replace units only to discover a single switch had flipped during a thunderstorm!
The power supply tells its own story. A multimeter set to alternating current reveals whether the outlet delivers the required voltage. South African garages, damp and dusty, are harsh environments for electrical connections.
- Loose terminals on the motor housing interrupt power intermittently.
- Corroded wire nuts create resistance that heats connections and lowers voltage.
- A worn power cord can short against the metal frame.
Working through these checks methodically narrows the fault. A motor receiving clean, consistent power yet refusing to move has crossed into mechanical failure, which is when the decision to repair garage door motor components becomes unavoidable.
Inspecting the Drive Belt, Chain, and Gear Assembly
The drive train transmits the motor’s force to the door. A snapped belt or a chain stretched beyond its tension limits leaves the motor spinning uselessly. I have opened housings to find gear teeth ground down to smooth nubs, with plastic debris scattered across the casing!
Inspect these components carefully:
– Check the belt for cracks and fraying along its full length.
– Check the chain for sagging, which signals wear.
– Examine the gear assembly for stripped teeth or metal shavings.
When these components fail, the motor may hum but the door stays put. That is when you must repair garage door motor systems or replace the worn parts.
Checking Limit Switch and Sensor Calibration
It is incredibly frustrating when your garage door refuses to budge. After ruling out a dead remote battery or a tripped circuit breaker, the issue often lies deeper within the motor unit itself. We often focus on the raw power of the system, but the true intelligence of the operation comes from the calibration. If the motor runs but the door stalls halfway or reverses unexpectedly, you are likely dealing with a misaligned limit switch or faulty sensor rather than a mechanical failure.
The limit switch is the unit’s internal memory, telling the motor precisely where to stop. When these stops drift out of adjustment, the door may press too hard against the ground or reverse before it even touches the floor. Sensor calibration is equally critical, as these safety eyes prevent the heavy door from closing on people, pets, or vehicles. A dirty lens or a slight misalignment caused by a bump from a broom handle can trigger the system to think the path is blocked, leaving you stranded outside in the rain.
If the door reacts inconsistently to your commands, the issue is often in the communication between the wall console and the motor. However, you should only attempt adjustments to the travel limits after you have confirmed the tracks are clear and the springs are balanced. Here is a methodical approach to tackle the electrical configuration:
1. Disconnect the motor from the carriage using the emergency release cord.
2. Manually lift the door halfway; if it stays put, the spring tension is correct.
3. Loosen the limit switch screws and turn them in minute increments to adjust the open and close positions.
4. Check that the safety sensors are aligned by noting if the indicator lights on both units are solid, not blinking.
5. Reconnect the motor and test the cycle, watching for any hesitation at the floor.
A frequently overlooked culprit for sensor failure is the sun. Direct sunlight can wash out the infrared beam, causing the door to reverse for no apparent reason. You might notice this happening only during the late afternoon. Installing a simple sun shield over the lenses can resolve this issue instantly. If you have cleaned the lenses and adjusted the brackets but the lights still flicker, inspect the wiring for rodent damage or corrosion, as these breaks can interrupt the signal intermittently.
When these components work in harmony, they create a seamless experience. When they fall out of sync, even a new motor can behave erratically. This is where the decision to spend time on a repair garage door motor procedure becomes a matter of patience versus practicality. You can often solve the problem with a screwdriver and a stepladder, but if the internal circuit board has sustained a power surge, no amount of external dial twisting will help. In those cases, understanding the diagnostic process allows you to speak confidently with a technician, ensuring you get a targeted fix for the sensor logic rather than a costly full system replacement.
Distinguishing Motor Issues from Track or Spring Problems
Let’s be honest: a garage door that refuses to cooperate is more than an inconvenience, it is a personal affront to your morning routine. You press the remote, you hear the motor hum, and then… nothing. Or worse, it screeches halfway up and decides to call it quits for the day. Before you hurl a spanner at the mechanism, take a breath. Your problem might not be the motor at all. In fact, a huge percentage of “motor failures” are actually just tired springs or a track that looks like a rollercoaster.
Knowing what you are looking at is half the battle. If you hear a grinding noise but the door moves a few centimetres and stops, the culprit is often a snapped torsion spring, not an electrical gremlin. Similarly, if the door shakes violently when moving, check the rails for dents or excessive dirt. The motor is strong, but it is not a miracle worker. It will struggle against a misaligned track until it eventually burns itself out. So, before you consider a costly repair garage door motor visit, inspect the physical health of the door itself first.
However, if the mechanical parts look perfect and the door still plays dead, you have shifted into the electrical zone. A common scenario involves the wall switch working flawlessly, yet the remote control leaving you stranded on the driveway. This usually points to a dead battery in the fob, but it can also be a faulty logic board inside the opener. If the unit clicks but the light stays on without the door moving, that is a classic sign of a capacitor draining its last bit of life. It is a specific failure that mimics a dead motor, so testing the capacitor with a multimeter is a smart DIY step.
Once you have confirmed the springs, cables, and tracks are all clear, and the power is definitely flowing, you can narrow it down further. The trick is to listen carefully to the motor housing itself.
– A single click then silence usually means the thermal overload switch has tripped. Wait 30 minutes and try again. If it trips quickly each time, the motor is straining.
– A loud bang followed by rattling suggests a broken gear inside the gearbox. This is common in older units and requires replacement parts.
– A humming motor with zero movement indicates the internal drive gear has stripped, or the emergency release cord has been pulled and not re-engaged properly.
These acoustic clues are vital. They tell you whether you are dealing with an electrical issue or a physical breakage. If you hear the motor spinning but the chain (or belt) isn’t moving, the problem is internal. This is where a DIY enthusiast can shine, but it is also where a professional might save you from a weekend of frustration. Replacing a drive gear is a messy job, but it is significantly cheaper than replacing the entire unit.
So, when you face that stubborn door tomorrow morning, remember to play detective before you pull out your wallet. Check the simple things first, listen to the sounds, and assess whether the track is clean. Often, a quick lubrication of the rollers and a battery swap is all the therapy you both need. But if the diagnosis points to an electrical failure deep within the box, you have a clear choice. Grab your tools and tackle it, or call in a technician to handle a repair garage door motor situation efficiently. Just make sure that if you DIY, you disconnect the power first. Your fingers will thank you.
Essential Tools and Safe Preparation
Gathering the Right Tools for Motor Service
Before you attempt to repair garage door motor components, you must assemble the correct toolkit. A haphazard approach invites frustration and injury. I always start by isolating the unit from its power source. This step is non negotiable. You need a circuit tester to confirm zero voltage, because the capacitor can hold a charge long after the switch is off.
Gather these essentials before you begin:
- Socket set with extensions for motor mounting bolts
- Flathead and Phillips screwdrivers in various sizes
- Needle nose pliers for retaining clips and springs
- Multimeter for continuity checks on the motor windings
Beyond hand tools, secure the door itself. Disconnect the emergency release and clamp the track to prevent the door from slamming down while you work. Wear safety glasses and work gloves. A clean, well lit workspace reduces mistakes. When you repair garage door motor parts, proper preparation shortens downtime and keeps every finger intact.
Disconnecting Power and Lockout Procedures
The most crucial step in any repair garage door motor project happens before you even pick up a screwdriver. It is the moment you introduce absolute certainty into the equation. While the mechanical failure might be obvious, the real threat is the invisible current waiting in the wires. Treating the unit with respect for its stored energy is not just a suggestion; it is the line between a simple fix and a serious injury.
Begin by locating the main power cord and tracing it back to the electrical outlet. Do not simply rely on the wall switch or the remote control to isolate the system. These devices only control the logic board, not the raw power entering the unit. You must disconnect the power source entirely. If the unit is hardwired, you will need to switch off the corresponding circuit breaker in your main panel.
Once the power is off, the work is not yet done. A professional never trusts the position of a breaker handle alone. Implement a physical lockout. Place a small padlock on the breaker switch or tape the panel shut to prevent anyone from accidentally restoring the power while you are working. This is a non-negotiable habit. After you have secured the breaker, take your multimeter and test the terminals inside the motor unit to confirm the voltage reading is zero. Capacitors can hold a lethal charge, so discharge them with an insulated screwdriver according to the manufacturer’s instructions before touching any internal wiring.
With the electrical threat neutralized, focus on the mechanical weight of the door. A garage door is a heavy counterbalanced system. You must release the emergency release cord to disengage the motor from the trolley. This allows you to manually lift the door to a safe height and clamp the track with locking pliers to prevent it from crashing down. This preparation creates a static, safe environment where you can diagnose the mechanical components without the door moving unexpectedly.
Releasing the Emergency Release Cord
Withthe power secured, you can now make the system safe for physical inspection. The emergency release cord is your mechanical failsafe, the simple red handle that severs the motor’s connection to the trolley. Pulling it with a firm, downward motion disengages the carriage, giving you manual control over the door. This step is crucial because a powerful motor can act as an unexpected counterweight.
Before you begin any hands-on work, take stock of your workspace. You will need specific tools, and they should be within arm’s reach before you start. This saves time and prevents the temptation to reach over a moving mechanism.
– Locking pliers to clamp the track and hold the door in place
– A sturdy ladder to reach the motor housing safely
– Work gloves to protect your hands from sharp metal edges and torsion springs
– A block of wood to chock the door if it slips
With the cord released, lift the door manually to a comfortable working height. Gravity is your enemy here, so clamp the track with the pliers immediately. A door that slams shut while you are exposed to the drive chain can cause severe injury, effectively ending your repair garage door motor session before it starts. This static setup provides a stable platform, allowing you to diagnose the internal components with clarity and confidence.
Protective Gear and Work Area Setup
A cluttered garage will sabotage your repair garage door motor work before you even touch a wrench. Sweep the area and set up a dedicated station. Move the car out, park a sturdy ladder near the trolley, and make sure the floor is dry.
Protective gear matters. Safety glasses keep rust and debris out of your eyes. Work gloves save your knuckles from the drive chain’s sharp teeth. Thick soled shoes matter when a socket wrench slips from your grip.
Use a checklist to keep your workspace sane:
- Locking pliers, placed within arm’s reach of the door track.
- A flashlight to inspect the motor housing without shadows.
- A clean bucket to organize screws and small parts.
- A fire extinguisher, because a motor short can spark.
That setup gives you freedom to focus on the actual repair garage door motor task. Your tools stay put, your body stays safe, and your sanity remains intact.
Identifying Motor Replacement Parts and Compatible Models
A garage door motor is a precision instrument, not a one size fits all component. When you begin a repair garage door motor project, the wrong replacement part can turn a two hour job into a weekend of frustration. The nameplate on the side of your current motor is your compass. It lists the model number, voltage, and horsepower. Write those down before you shop or order online.
Common brands in South Africa include Digi-Door, ET, and Gemini. Their internal parts are rarely interchangeable. A trolley gear from one brand does not fit another. Check the physical dimensions of the capacitor and the shaft diameter before you commit. Here is what to inspect on the old unit:
– The exact winding on the motor coils.
– The type of limit switch assembly.
– The mounting bracket hole spacing.
Once you have verified the part, focus on the service environment. Keep a mat under the motor housing to catch stray springs. Use a magnetic tray for screws. The process of identifying compatible models is tedious but essential. A precise match ensures the safety mechanisms engage correctly. This careful preparation prevents a second failure and keeps the door operating smoothly for years.
Step-by-Step Motor Service and Repair
Removing the Motor Cover and Exposing Internal Components
Without its cover, a garage motor’s internal components face dust, moisture, and physical interference. In South Africa, where coastal humidity and inland dust differ enormously, the housing provides essential protection. I have seen motors fail purely because a cover was left loose during an earlier service.
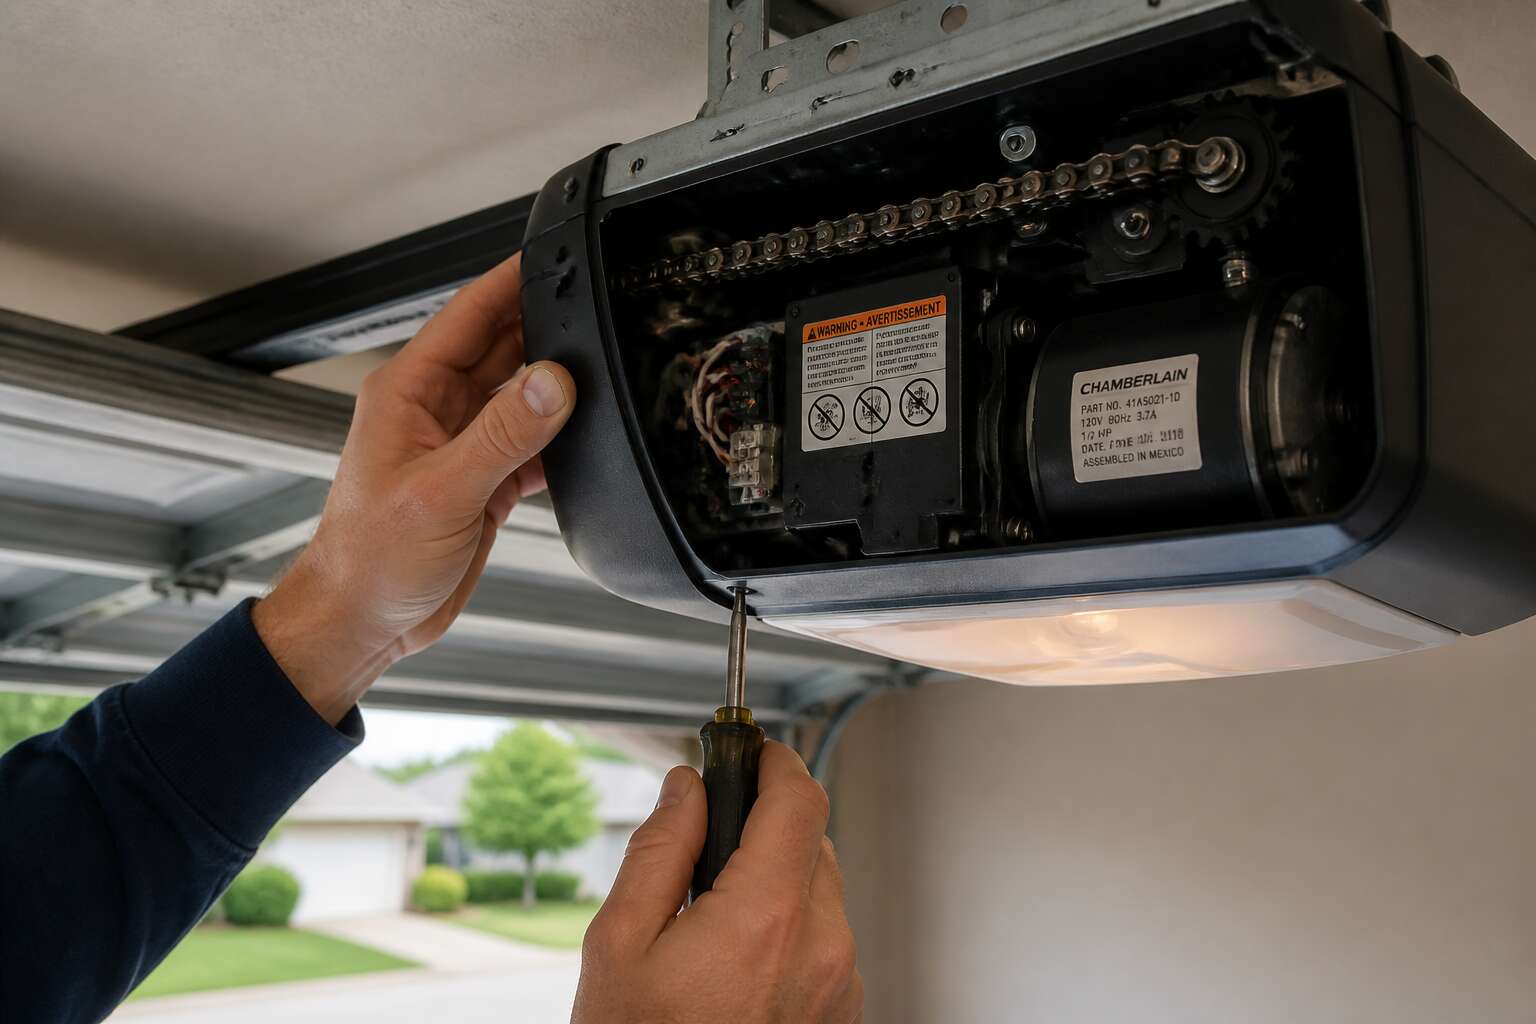
Removing the cover reveals the complete drive assembly: capacitors, the control board, and the worm gear that converts rotation into door travel. Begin with the retaining screws. Manufacturers typically use Phillips or Torx heads, often coated with thread-locking compound. A cordless driver with a magnetic bit holder prevents fasteners from falling into the chassis. Once the casing lifts free, examine the rubber gasket for cracks or compression damage. This stage shapes the entire approach to repair garage door motor systems.
Expect to find:
- Capacitors showing bulge or leakage
- Old lubricant hardened into a thick paste
- Wiring connectors loosened by years of vibration
Handle each part deliberately. A slipped screwdriver can scar a circuit trace, turning a simple service into an expensive replacement.
Cleaning and Lubricating Moving Parts
A quiet motor isn’t a happy motor. After inspecting the internals, your next step in any repair garage door motor project is addressing the friction points. Old grease turns into a glue-like paste that strains the entire assembly. This is where patience pays off.
Clean the worm gear and the drive gears thoroughly. Use a degreaser and a stiff nylon brush to lift the hardened residue. Wipe the raceways clean with a lint-free cloth. Once the surfaces are bare, apply a fresh layer of lithium-based grease. This specific lubricant adheres well and withstands South African temperature swings.
Apply sparingly to the critical contact surfaces:
– The worm gear threads
– The trolley’s chain or belt teeth
– The rail’s sliding surface
– The idler pulley bearings
Resist the urge to over-lubricate. Excess grease attracts dust and forms a new abrasive paste. Once you finish this step, the mechanical components are ready for reassembly. A properly lubricated unit runs smoother, draws less power, and prolongs the lifespan of your repair garage door motor components.
Replacing Faulty Capacitors and Start Switches
The capacitor is the unsung workhorse, or more accurately, the kick in the backside that gets your motor moving. When it fails, you will hear a loud, repetitive clicking from the unit, a sound of futility rather than power. The motor itself might hum, but it will refuse to turn over. You are now dealing with a repair garage door motor issue that requires a steady hand and a keen eye for bulging metal cans.
Before you touch anything, discharge that capacitor. Use an insulated screwdriver to short the terminals. A residual charge can give you a memorable jolt. Your replacement capacitor must match the microfarad rating and voltage exactly. Installation is straightforward, but the orientation of the wires matters.
Follow this sequence for a smooth replacement:
1. Take a clear photo of the wiring layout before disconnecting anything.
2. Remove the wire nuts and isolate each connection.
3. Secure the new capacitor in the bracket and reconnect the wires.
4. Reattach the cover and restore power to test the cycle.
Do not forget the start switch, the simpler cousin to the capacitor. If the motor runs but the light stays off, or if it stops halfway through a cycle, the switch contacts are likely burnt. Testing it requires a multimeter set to continuity. A closed circuit when the button is pressed is the green light you need. If the switch fails, replace it with a model that fits the housing. This entire process is a standard part of any repair garage door motor service. Once completed, you will have restored the brain and muscle connection, ensuring the door responds to your command without hesitation.
Adjusting Travel Limits and Force Settings
Most garage door accidents in South Africa trace back to two screws and a pair of knobs. Travel limits and force settings determine the door’s behaviour. Get them wrong, and the door slams or refuses to close. Adjusting them requires precision.
Travel limit screws control how far the door travels. The force settings control how much resistance the motor tolerates before reversing. A door that reverses halfway usually has a sensitive force setting. One that crushes a box is too aggressive.
My sequence for repair garage door motor service:
- Loosen the limit switch screws.
- Turn the open limit screw clockwise to increase travel, counterclockwise to decrease.
- Repeat for the close limit.
- Adjust the force knobs in small increments.
The door should stop with a firm seal, not a slam. The reverse mechanism should trigger with light hand pressure. This separates a working repair garage door motor from a reliable one.
Reinstalling and Reconnecting the Motor Unit
The workbench holds the clean and refurbished parts, each one a small testament to your patience. Reinstalling the motor unit is the reverse of the removal process, yet it demands the same level of attention. Lift the motor back into its mounting brackets, ensuring it sits level and true. A misaligned motor will cause unnecessary wear on the drive gear and the track system, leading to future failures. Hand-tighten the mounting bolts first, then use your torque wrench for a firm, even hold. This secures the heart of your garage door system without stripping the threads or stressing the chassis.
Before you reconnect anything, double check that the power remains off at the breaker. This step is non-negotiable for your safety. Now, reattach the wiring harness, connecting the main power leads and the sensitive limit switch wires. Pay close attention to the color coding and connector shapes. A reversed wire can cause the motor to run in the wrong direction or create a short circuit. For a clean connection, follow these steps:
– Plug in the main motor harness and the control board connector.
– Secure the ground wire to the designated bolt on the chassis.
– Reattach the chain or belt to the drive sprocket and re-tension it according to the manufacturer’s specs.
Once the wiring is secure, route the cables away from any moving parts, using the provided clips to keep them tidy. Slide the safety sensor wires back through their guides and connect them to the terminals. With everything connected, you can restore power. The moment of truth arrives when you press the wall button. The motor should hum to life, moving the trolley smoothly along the rail. Listen for any grinding or hesitation. A smooth operation confirms that your careful work has paid off, and the system is ready for final adjustments.
Testing Operation and Fine-Tuning Performance
The moment of truth arrives as you press the wall button, your thumb hovering with a mix of hope and trepidation. The motor hums to life, and the trolley begins its journey along the rail. Listen closely for any grinding, hesitation, or unusual vibration. A smooth, steady operation confirms that your careful work has paid off. If the door stutters or reverses unexpectedly, do not panic. This often indicates a simple calibration issue rather than a mechanical failure. You will need to adjust the travel limits and the force sensitivity, which are typically located on the motor housing. These controls dictate how far the door travels and how much resistance it can safely encounter before reversing.
Once the initial movement is smooth, focus on the finer details of the operation. Test the door’s balance by disengaging the emergency release cord and manually lifting the door halfway. It should stay put without drifting up or down. If it falls, the torsion spring counterbalance is off, placing unnecessary strain on the new motor. This tension directly impacts the lifespan of your repair garage door motor work. After re-engaging the release, run a full open and close cycle. Watch the door meet the floor with even pressure across the entire bottom seal. An unbalanced door will cause one corner to hit harder than the other, leading to premature wear on the weatherstripping and the track system.
Fine-tuning the electronic components is the final step in any professional repair garage door motor service. Most modern units have a “learn” button that programs the remote controls and sets the exact open and close positions. Press the learn button, then hold the remote. The motor will blink to confirm the connection. For the travel limits, use a flathead screwdriver to adjust the limit switches. Tighten the close limit until the door seals completely but does not crush the rubber stopper. A fraction of a turn makes a significant difference. Remember that the force adjustment should be set to the lowest setting that still allows the door to move smoothly. This prevents the motor from causing serious injury if it closes on an obstruction.
A successful motor service requires a holistic view of the entire system. The wiring connections, the rail alignment, and the spring tension all contribute to the final performance. Test the auto-reverse feature by placing a block of wood on the floor in the door’s path. When the door contacts the wood, it should immediately stop and reverse. This safety check is non-negotiable, especially in homes with children or pets. If the motor is sluggish during extended operation, inspect the gears for signs of wear. Nylon gears are common and will wear down over time, creating a grinding noise. Replacing these gears is a routine part of preventive maintenance. With the system balanced and calibrated, the door should glide effortlessly, offering quiet and reliable operation for years to come. The peace of mind that comes from a correctly serviced motor makes the effort worthwhile, ensuring your daily routine remains uninterrupted. Remember to consider how power fluctuations and load shedding schedules may impact your motor’s circuitry. Investing in a surge protector or battery backup can safeguard your electronic controls and keep your garage accessible during outages. A comprehensive approach ensures your motor is prepared for the unique stresses of the South African environment.
Repair or Replace: Making the Right Call
Estimating the Cost of Common Motor Repairs
A grinding or screeching noise from your garage is never a good sign. It usually means the motor is struggling, and you are facing a decision: repair garage door motor components or replace the whole unit. Many homeowners panic, assuming the worst. A simple fix often solves the problem, but a complete failure demands a new motor.
You need to diagnose the situation before you spend any money. A failing motor that still runs may only need new capacitors or gears. These are inexpensive parts. However, if the motor emits a burning smell or stops working entirely, the internal windings are likely fried. Replacing those costs nearly as much as a new motor, so a replacement becomes the smart financial move.
The age of your system is the biggest factor in this decision. A motor older than fifteen years is living on borrowed time. Investing in new parts for an aging motor is throwing money into a pit. Newer motors offer better safety features and energy efficiency. If your current unit is old and broken, upgrading is the better value.
Your budget also dictates the right path. A basic repair garage door motor visit will set you back between R800 and R1,500 for labor and parts. A brand new motor installation costs anywhere from R4,500 to R9,000 depending on the brand and horsepower. Consider this cost breakdown:
1. Diagnostic fee: Most companies charge a call-out fee, but this is often waived if you proceed with the repair garage door motor work.
2. Replacement parts: Gears and circuit boards are the most common failures. These are cheaper than a full unit.
3. Labor costs: Technicians charge by the hour. Expect the job to take two to three hours for a straight swap.
Look at the warranty. If your motor is still under warranty, you should never pay for a replacement. The manufacturer will cover the faulty parts. You will only pay for the labor to install the new motor. If the warranty has lapsed, weigh the cost of a repair against the potential for another breakdown next month. A second repair within a year means you should have replaced it the first time.
Assessing Motor Age and Usage History
Most garage door motors have the lifespan of a particularly moody goldfish. Fifteen years is a good run. Some units pass on closer to the ten year mark. Others keep grinding along for two decades, powered by spite and poor lubrication. Your repair garage door motor decision hinges entirely on this timeline. A unit past its prime is a candidate for retirement. Throwing new parts at it is like buying new tyres for a car with no engine.
Usage history matters more than you think. A motor that opens the door twice a day daily has less wear than one in a rental property that runs a dozen cycles. Consider these usage patterns:
– High traffic households with kids and vehicles need robust motors. They cycle constantly.
– Locked garages used for storage see minimal action. Their motors last longer.
– Commercial applications run hundreds of cycles per week. Repairs here are merely delaying the inevitable.
The real question is whether your current motor has earned its keep. If it has served faithfully for years and finally limped, a replacement makes sense. If it fails two years in, a repair garage door motor visit is the economic choice. Simple arithmetic: the cost of a new unit divided by its expected lifespan gives you an annual cost. Compare that to the repair bill. If the repair exceeds half the replacement cost and the motor is old, part ways. If the motor has years left, fix it and move on.
Comparing Repair Costs with New Opener Prices
A replacement unit carries a price tag that often makes a single service call look trivial. Yet the real cost of a new opener includes installation, disposal of the old unit, and the hidden expense of your time. When you price a repair garage door motor service against a full install, the gap narrows considerably. Consider the numbers. A common repair for a capacitor or gear assembly runs a fraction of a new motor. That repair also buys you years of additional service, especially if the rest of the system is sound. Spending a small amount now to extend a motor’s life is often the smarter financial move.
Then there is the matter of repeated repairs. One service visit is an anomaly. Three visits in a single year signals a deeper problem. At that point, the logic flips. The money spent on a third repair could have covered a deposit on a new opener. Here is how to break down the decision when you face a significant failure:
– Compare the quoted repair bill against 50% of the cost for a new, comparable motor.
– If the repair is less than half the replacement cost, and the motor is under ten years old, fix it.
– If the repair exceeds that 50% threshold, or the motor is older, start researching new openers.
This rule of thumb holds true for most residential setups in South Africa, where power surges and load shedding add extra strain to motors. A hybrid motor with a battery backup, for instance, changes the equation entirely. The robust engineering of a new unit may justify the upfront expense if your current motor lacks the resilience for frequent outages. A repair garage door motor specialist can give you a proper quote, but the arithmetic should guide you before you make that call. Weigh the annual cost of ownership, not just the immediate bill, to find the true value in your decision.
Considering Smart Garage Door Opener Upgrades
Repair Garage Door Motor: A Practical Guide for Homeowners
Few things disrupt a morning routine quite like a garage door that refuses to cooperate. The grinding silence when you press the remote, the unresponsive pull cord, the sudden halt halfway up the track—it all points to one stubborn reality. You are facing a decision that hinges on cost, patience, and the age of your equipment.
Before you surrender to the idea of a brand-new unit, consider this: your current system may only be suffering from a minor ailment. A common misconception is that a noisy or dead motor necessitates a full replacement. In many cases, the issue lies in a failed capacitor, a worn gear assembly, or a simple electrical fault. Choosing to repair garage door motor components can be a surprisingly economical route, preserving a system that has years of life left in it.
Diagnosing the Silent Beast
First, determine whether the motor is actually running. If you hear a hum but the door does not move, the internal gears have likely stripped. This is a classic failure point. If the unit is completely silent, check the power source and the circuit breaker. A tripped breaker or a blown fuse is often the simplest culprit.
When the basics check out, you are left with more specific possibilities. Use this checklist to narrow down the problem:
– Check the condition of the torsion springs. A broken spring creates a heavy load the motor cannot handle.
– Inspect the safety sensors near the floor. Misaligned eyes will stop the motor entirely.
– Verify that the manual release cord has not been accidentally pulled, disengaging the trolley.
You might be tempted to call a technician immediately, but many of these checks are quick and safe to perform yourself. If you discover a sensor misalignment, you have just avoided a costly service visit. However, for internal motor issues, DIY repairs can become messy. This is where the financial math becomes crucial.
Weighing the Financial Equation
The age of your opener plays a massive role in this calculation. A newer unit, under ten years old, is usually worth fixing. The parts are readily available, and the labor costs are often less than half of a full replacement. On the other hand, a unit approaching fifteen years old may be obsolete. Finding parts for older models can be difficult, and the electronic circuit boards degrade over time.
If you decide to repair garage door motor internals, you are typically looking at the cost of a new capacitor or gear kit. These parts are inexpensive. The real expense is the professional labor required to access them. Compare this to the price of a new opener, which includes the motor assembly, the rail system, and installation fees. The gap is significant.
Yet, a low repair bill does not always mean you are saving money. If your door is imbalanced or the tracks are bent, the new motor will still struggle. This strain will shorten its lifespan dramatically. The repair only makes sense if the surrounding mechanics are in solid shape. If the door moves smoothly when disengaged manually, the repair is a sound investment.
The Verdict on Long-Term Value
Consider the annual cost of ownership. A repair that costs R1,500 might give you another four years of service. That amounts to R375 per year to keep your current system running. A new installation costing R6,500, if it lasts ten years, averages R650 per year. On paper, the repair wins, provided the unit does not fail again next month.
However, you must also factor in safety. Older openers lack modern safety features like auto-reverse sensors that meet current standards. If your unit predates these regulations, your family is at risk. In this scenario, the upgrade is not a luxury; it is a necessity. Newer models also offer battery backups, which are invaluable during the frequent load-shedding schedules that disrupt South African households.
Ultimately, the decision rests on the condition of the trolley, the state of the springs, and the motor’s operational history. If you are facing a simple capacitor failure, the choice is obvious. If the motor is smoking or the logic board is fried, cut your losses. Replacing the unit gives you a warranty, peace of mind, and a quieter operation. A smart homeowner knows when to hold on and when to let go. Listen to the sounds, check the age, and count the cost. The answer will become clear before you ever reach for the phone.
Preventive Maintenance to Extend Motor Life
Monthly Visual Inspection and Noise Check
Some say the quiet hum of a well tuned motor is a sign of domestic peace, while a rattle is the first whisper of a costly breakdown. South African weather, with its punishing sun and Highveld thunderstorms, accelerates wear on components that might last longer elsewhere. A monthly ritual of looking and listening, taking no more than fifteen minutes, can prevent the need for a full repair garage door motor callout later.
During your visual sweep, focus on the hardware that anchors everything. The torsion spring gap should be checked for evenness, and the mounting brackets need to stay fixed to the concrete. Any movement or rust here compromises the entire system. When you listen, distinguish between the whir of healthy gears and a grinding that suggests the internal drive sprocket is shedding plastic or steel. A chirping sound, often mistaken for a bird stuck in the mechanism, is frequently the first sign of dry bearings or a failing belt tensioner, not the motor itself. This is why immediate professional repair garage door motor service often involves parts you predicted, not surprises. The simple act of monthly observation gives you leverage over your budget, turning a potential emergency into a scheduled, manageable decision.
Lubrication Schedule for Gears and Moving Assemblies
Lubrication costs little and prevents expensive wear. The Highveld dust acts like sandpaper on moving assemblies, and a dry gear train will grind itself into an early retirement. A scheduled routine, every six months, keeps internal components sliding instead of fighting.
Focus on the bearing surfaces and the chain or belt interface. Apply a silicone based lubricant sparingly. Never use grease, which attracts grit. Wipe away old residue before adding fresh product.
Points to include in your routine:
- Motor drive sprocket and chain contact points
- Bearing surfaces on the traveler assembly
- Hinge pins on the door sections themselves
A consistent schedule reduces friction and heat. That translates into fewer instances where you need a repair garage door motor callout. The cost of lubricant is negligible compared to the labour of a technician. In my experience, this routine saves more motors than any emergency intervention. It is that simple!
Keeping Track Sensors Clean and Aligned
The safety sensors are the most exposed components on the system. They sit low on the track, at the height where Highveld dust, mud splatter, and spiders gather. A thin film of grime blocks the infrared beam. The motor refuses to close the door, which sends homeowners into a premature repair garage door motor callout.
Wipe the lenses with a soft, dry cloth every second month. Use a drop of warm soapy water for stubborn residue, then dry thoroughly. Check alignment by watching the indicator lights; both should glow steadily. If one flickers, the bracket has moved. Loosen the wing nuts, adjust the sensor, and retighten:
- Confirm the beam runs parallel to the track.
- Clear cobwebs or debris between the sensors.
- Inspect wires for rodent damage.
A few minutes of attention prevents intermittent faults that strain the logic board. That strain often leads to a repair garage door motor callout.
Testing Safety Reverse Features
According to a Consumer Product Safety Commission study, roughly 20,000 people visit emergency rooms yearly due to garage door accidents. That statistic underscores the gravity of a simple, two minute test most South African homeowners overlook. The motor moves the door, but the reversal mechanism ensures it never becomes a trap.
Testing the safety reverse feature is a tactile exercise. Place a solid object, like a block of wood, on the floor in the door’s path. Press the close button. Upon contacting the obstruction, the door should stop and reverse direction within two seconds. A lag longer than that signals failing springs or a worn logic board. This condition demands a professional repair garage door motor service before the system fails catastrophically.
The mechanisms at play are the force settings and the closing speed. If the door slams down, it builds momentum that overrides the reversal system.
- Check the auto reverse by using a rolled towel as the test object monthly.
- Inspect the track for uneven wear that might disrupt the door’s balance.
- Verify the photo eye sensors trigger the reverse without physical contact.
A system that crushes a paper cup is a system that can crush a pet. That extra second of hesitation in the motor mechanism is often the only buffer between a close call and a catastrophe. Don’t ignore that hesitation. It signals the need for a comprehensive repair garage door motor assessment to restore the safety margin your family depends on.
When to Call a Professional Technician
Preventive maintenance is the quiet guardian of your garage door’s lifespan. A well-cared-for motor hums along for years, while a neglected one often fails at the worst possible moment, usually on a rainy Monday morning. The secret is not in grand gestures, but in a routine of small, consistent checks.
Start with the physical environment. The motor unit resides in a space that experiences extreme temperature swings, from the Highveld’s frosty mornings to the humid coastal air of KwaZulu-Natal. This constant exposure causes rubber belts to stretch and metal chains to lose their lubrication. A simple monthly wipe-down of the rails removes built-up grit that acts like sandpaper on the moving parts.
Here is a practical rhythm to follow every quarter:
– Inspect the mounting brackets and bolts for any signs of loosening.
– Listen for unusual grinding or whining sounds during operation.
– Check the tension on the drive chain or belt, adjusting only if your manual specifies.
– Clear the area around the motor unit of cobwebs and dust.
Beyond the hardware, the electrical components require attention. South African power grids are notorious for surges and dips. A surge protector installed at the mains outlet for the motor is a small investment that prevents fried circuit boards. Also, test the manual release cord twice a year. This ensures that if the power fails entirely, you are not trapped inside or outside your home.
When you notice the motor struggling to lift the door, or if it stops halfway with a shudder, the time for DIY fixes has passed. While lubrication and tightening are within reach, the internal gears and the capacitor are delicate. Attempting to repair garage door motor internals without the right expertise often leads to more expensive damage. A professional technician can diagnose whether the issue is electrical or mechanical, saving you from replacing a perfectly good unit out of frustration. Regular care extends the motor’s life, but knowing when to call for expert help protects your investment.

0 Comments