
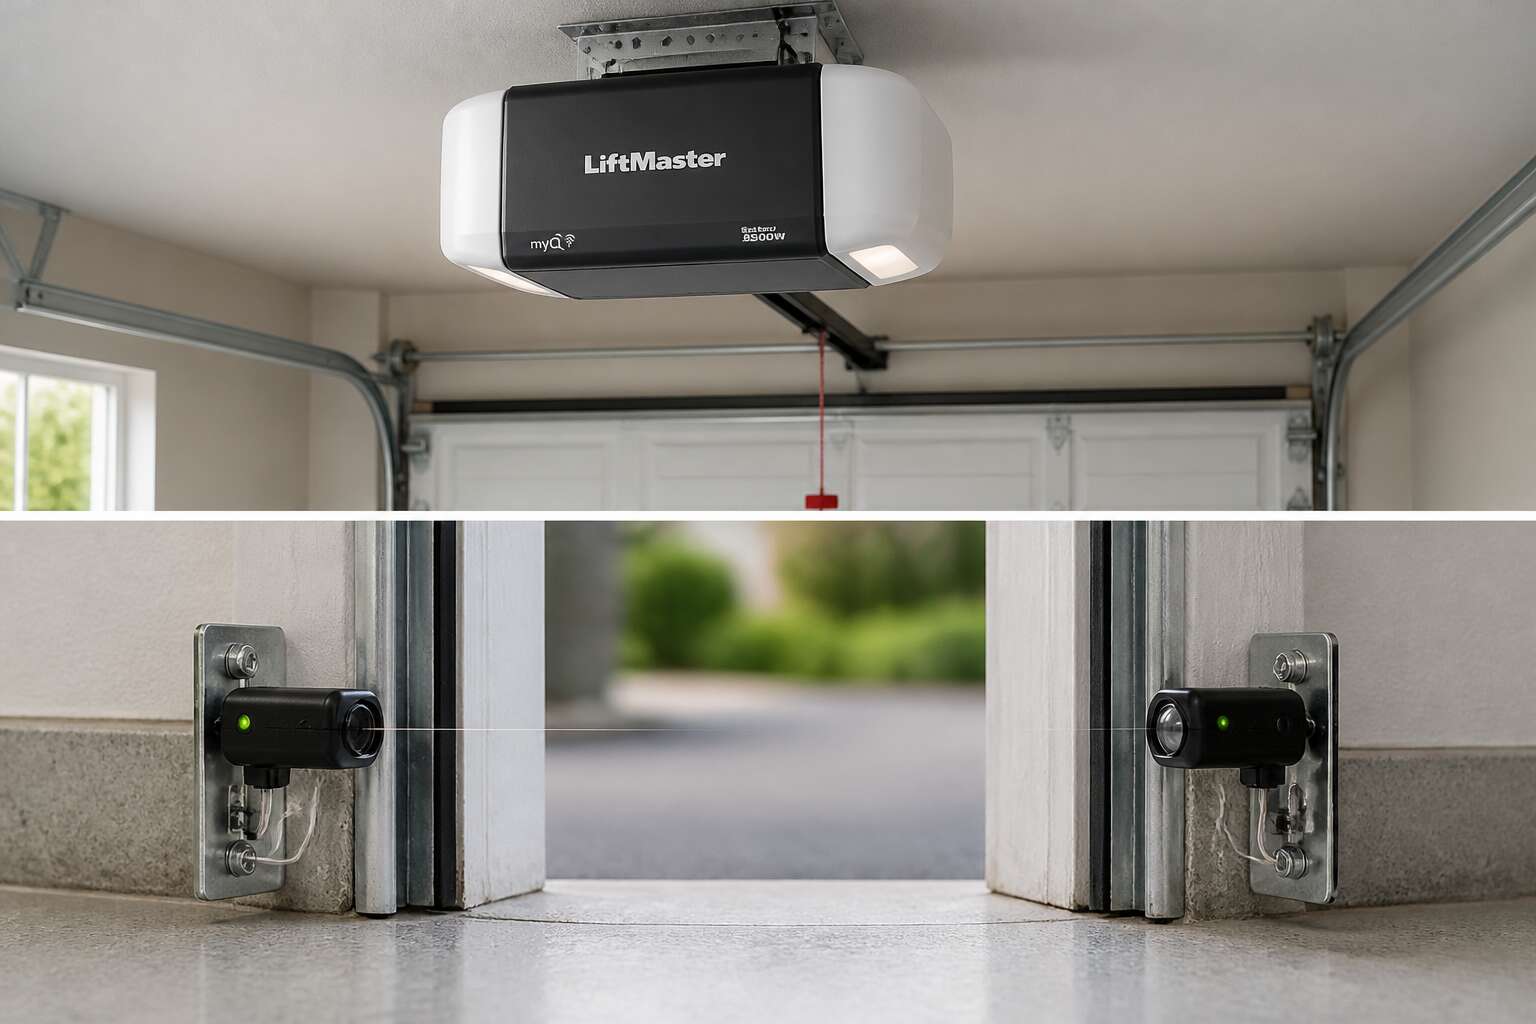
The Anatomy of an Automatic Garage System
The Role of the Garage Door Opener Motor
Every automatic garage system leans on a small but relentless workhorse: the opener motor. This unit does more than pull a chain. It manages torque, speed, and safety signals through a compact circuit board. The motor drives a trolley along a rail, lifting a door that can weigh over sixty kilograms. South African homes often face load shedding, which stresses these systems.
Within that assembly, the garage door motor and sensor pair form a critical loop. A photoelectric sensor checks the doorway for obstructions. If it detects anything, the motor halts instantly. That coordination prevents crushed cars or worse!
- Direct drive motors mount quietly on the rail
- Belt drives reduce vibration
- Chain drives handle heavy doors
Dust alone has killed many units I have inspected, settling inside the motor housing and smearing the sensor lenses.
Types of Safety Sensors: Photoelectric and Pressure-Sensitive
A single crushed bicycle is enough to make anyone respect the safety sensors. Every automatic door is a collection of springs, tracks, and safety devices. The garage door motor and sensor loop coordinates the opening cycle. Two sensor families dominate. Photoelectric units project a beam across the opening. If anything breaks the beam, the motor reverses instantly. Pressure-sensitive edges sit on the bottom of the door and respond to direct contact.
South African homes need both. Dust and load shedding foul photoelectric lenses, while pressure strips catch what the beam misses. I have seen a spider web halt a door. That is why modern kits pair the two.
- Photoelectric sensors: beam based, fast, sensitive to dirt
- Pressure-sensitive edges: contact based, slower, immune to dust
The whole system depends on every component. A forgotten lens or frayed wire can stop the door.
Understanding Tracks, Springs, and Cables
Tracks, springs, and cables do the heavy lifting, literally. The garage door motor and sensor coordinate the cycle, but mechanical parts carry the weight. A standard double garage door weighs around 100 kilograms. Torsion springs counterbalance that mass. Cables transfer tension to the bottom brackets. Tracks keep everything aligned.
Here is what I tell every homeowner:
- Lubricate tracks quarterly with silicone spray
- Replace springs after roughly 10,000 open and close cycles
- Inspect cables monthly for fraying
A frayed cable snaps without warning. A smart control system cannot fix mechanical failure. Regular visual checks prevent costly damage.
Control Panels and Remote Signaling
Your control panel has precisely one job. Someone presses a button, the panel verifies the rolling code, and the garage door motor and sensor system gets the message. That is the entire transaction. No negotiation, no small talk, no opinion about your breakfast cereal.
Rolling code technology deserves more respect. Every press generates a fresh code, so a thief with a code grabber captures a number that will never work again. I have tested this. I have also watched a neighbour try his remote on my garage door and fail mysteriously, which is precisely what the system is designed to ensure.
- Wall panels connect via hardwired links to the motor unit
- Remote signalling in South Africa runs on 433 MHz or 868 MHz
- The lockout feature on your panel disables remotes completely
Smartphone integration adds convenience, yet the wall switch remains the most dependable interface!
How the Drive Mechanism Collaborates with Safety Sensors
The Opening Cycle: Signal Transmission
Homeowners press the remote and expect an immediate response. The opening cycle depends on precise collaboration between components. In South Africa, power surges and load shedding make this coordination even more critical. The garage door motor and sensor must work in near perfect sync.
When the signal arrives, the motor activates the drive mechanism. It also commands the safety sensors to check the doorway. This verification happens in milliseconds. No human reflex matches that speed.
The sequence follows a strict protocol:
1. Remote transmits the open command.
2. Motor receives and acknowledges the signal.
3. Safety sensors verify the path is clear.
4. Motor proceeds only with a confirmed status.
5. Door begins upward travel.
If a sensor detects a blockage, it sends a halt signal. The motor stops instantly. This communication loop prevents damage and injury. A properly aligned garage door motor and sensor system delivers this silent coordination every cycle.
The Closing Cycle: Safety Reversal Protocol
The closing cycle asks more from your garage door motor and sensor combo. Unlike the opening routine, the descent relies on detecting objects that enter the path after the cycle begins.
The motor drives the trolley downward while the photoelectric sensor fires an infrared beam across the doorway. When the sensor loses the beam, it signals the motor within milliseconds. The motor halts and reverses direction, raising the door to full open. This reversal uses motor torque to clear the obstruction without hesitation.
- Sensor loses the beam
- Controller reverses motor polarity
- Door travels upward until the limit switch triggers
Some systems add a pressure sensor along the bottom edge as a failsafe. If the beam fails due to dust or misalignment, the edge sensor still catches contact. In South Africa, where load shedding creates voltage fluctuations, this layered protection matters for every garage door motor and sensor installation.
Sensor Alignment and Its Impact on Performance
The drive mechanism and safety sensor perform their most delicate work in milliseconds. The trolley moves along its track while the photoelectric emitter works to hold its beam locked on the receiver. Break that beam and the logic board receives a stop command, reverses motor polarity, and sends the door back upward. A well integrated garage door motor and sensor system completes the entire sequence without hesitation.
Sensor alignment governs every part of that exchange. When a bracket shifts from thermal expansion or a lens collects Highveld dust, the beam weakens. The receiver loses the signal intermittently, causing the motor to stutter or reverse at random points. In our experience, load shedding adds another variable! Unstable voltage can make the logic board misread a marginal signal. A garage door motor and sensor setup degrades quietly, and the first warning is usually a door that refuses to close.
Motor Force Settings and Sensitivity
The force setting on a garage door motor and sensor system determines how much resistance the door may ignore. Set too high, the motor pushes through an obstruction, overriding the safety sensor. Set too low, the door reverses on a breeze or slight track vibration.
Engineers calibrate sensitivity to match the drive mechanism’s torque curve and the sensor’s signal strength. From our workshop floor, load shedding complicates the equation. Unstable voltage can make the logic board misread a marginal beam signal as a genuine obstruction, causing the motor to stutter or reverse at random points.
- Force settings govern torque during opening, closing, and reversal.
- Sensor sensitivity defines how much signal loss triggers a stop command.
- Grid voltage shifts both thresholds unpredictably.
A well tuned garage door motor and sensor system reconciles these variables in real time, comparing beam strength against force thresholds.
The Role of Limit Switches in Travel Calibration
The drive mechanism and safety sensors are partners in every cycle. When the photoelectric beam loses signal, the logic board does not simply stop the motor. It cross references the loss against the motor’s current draw and the position on the travel path. This real time collaboration prevents false stops during a gust of wind or a minor track vibration. In our experience, a well tuned garage door motor and sensor responds with a brief hesitation, not a full reversal.
Limit switches provide the boundaries for that journey. They are mechanical or magnetic triggers that tell the motor when to cut power. In any garage door motor and sensor setup, these switches define the open and closed positions. Proper calibration ensures the door closes completely without slamming into the floor. A technician also checks these switches for wear, because a failing limit switch can cause the door to reverse at random moments, confusing both the logic board and the user.
Common Failures and Troubleshooting Techniques
Motor Runs but the Door Remains Stationary
A motor that hums while the door stays put is a peculiar sight. It suggests the garage door motor and sensor system has lost its connection to the mechanics. The usual culprit is a stripped drive gear or a broken trolley coupling. Sometimes the emergency release cord remains pulled, leaving the carriage disengaged.
Check the trolley first. If it moves along the rail but the door does not, the problem lies in the arm or the cable drum. For a chain drive, inspect the chain tension. For a belt drive, look for slippage. I once spent an hour replacing a sensor, only to find a disconnected clutch.
Follow these steps:
1. Pull the emergency cord and manually lift the door halfway.
2. Re-engage the carriage by pulling the cord toward the motor.
3. Listen for grinding sounds that indicate stripped gears.
Each failure isolates the part that needs attention.
Indicator Lights Blinking: Meaning and Fixes
Blinking indicator lights on the garage door motor and sensor unit are the system’s way of communicating. Each pattern carries its own meaning:
- Two blinks: safety sensors are misaligned or obstructed
- Four blinks: wiring fault in the sensor circuit
- Five blinks: motor overheating or force limit reached
The fix starts by counting the blinks and matching them against the diagnostic chart on your motor housing. Many South African homes contend with dust and spider webs covering the sensor lens. A dry cloth wipe restores function in most cases. Clean both sensors at the same time to keep the pair matched.
If cleaning does not resolve the issue, inspect the sensor wires for damage. Garden tools and rodents cause most cable failures. The garage door motor and sensor work as paired components. When one side drops out, the entire unit refuses to operate. Let the blinking pattern direct your repair. Each signal narrows the possibilities and leads you closer to the real fault.
Door Reverses Unexpectedly
A door reversing without warning feels like a betrayal, yet the logic behind it is coldly simple. The garage door motor and sensor detects resistance or an interrupted beam and aborts the cycle to protect whatever crossed its path. But sometimes the threat is phantom. A loose chain, a worn roller, or a gust of wind rattling the panels can trigger the same response.
Troubleshooting requires patience. Watch the door’s movement closely during a cycle. Does it hesitate before reversing? Does the reversal happen at the same point every time? I once traced a phantom reversal to a spider web that formed between cycles!
- Inspect the tracks for debris or bends.
- Check the tension on the drive chain or belt.
- Listen for grinding sounds that indicate worn parts.
These clues separate real hazards from false alarms. The system acts on what it perceives, not what you intend.
Remote Control and Wall Switch Malfunctions
Your remote and wall switch are the input layer of the garage door motor and sensor setup. When they misbehave, the door ignores you completely. A remote that works in the lounge but not the driveway points to signal attenuation. The antenna on the motor unit might be tucked behind a metal bracket. Wall switches develop their own quirks. A loose terminal screw creates a connection that works only at certain temperatures.
Common failures to inspect:
– Batteries that test fine but deliver low current under load
– Wall switch contacts with oxidation or burn marks
– Receiver boards with cold solder joints after years of vibration
The wall switch sends a hardwired signal, yet it fails with the same drama as the wireless remote. Both end up confusing the garage door motor and sensor, which then ignores valid commands. One client’s remote only worked after he tapped it on the door frame. The culprit was a cracked solder joint, not a flat battery. The garage door motor and sensor was healthy the entire time.
Unusual Noises and Motor Bearing Wear
An unusual noise from the garage door motor and sensor unit is rarely random. A grinding sound during the opening cycle often points to worn motor bearings. These bearings support the motor shaft, and when they lose their lubrication, metal rubs against metal, producing a harsh scraping rhythm.
The garage door motor and sensor assembly depends on smooth rotation. Worn bearings create a cyclical squeal that rises in pitch as the door accelerates. Left unattended, the motor draws more current, runs hotter, and eventually trips its thermal overload protection mid-cycle.
- A high-pitched shriek at start-up indicates bearing friction from dried grease
- A rumbling groan that fades after a few seconds suggests uneven bearing wear
- A rapid clicking that matches the motor speed points to a damaged bearing race
Diagnosing these sounds early spares the whole system from a premature breakdown. That subtle chirp in winter becomes a full motor seizure by summer.
Testing and Replacing a Faulty Sensor
A faulty safety sensor often mimics a motor problem. The garage door motor and sensor work as a closed loop, but when the photodiode degrades, the unit receives a false obstruction signal. I always start with a multimeter and a steady hand. Measure the DC voltage across the sensor terminals while the door is idle; a reading below the specified range means the emitter is weak. Corrosion on the bracket terminals is another common culprit, especially in coastal South African towns where humidity attacks exposed copper. Replacing the sensor means loosening the wing nuts and sliding the old unit off the rail. Once the new sensor is secured, run the full garage door motor and sensor cycle. A solid indicator light confirms the replacement is seated correctly. A simple continuity test on the wiring harness saves you from swapping a perfectly good sensor!
Maintenance, Safety, and Smart Upgrades
Routine Inspection Checklist for Drive Units and Sensors
To keep a garage door motor and sensor working past its expected lifespan, you need more than an occasional glance. You need a deliberate examination of the drive unit’s physical state, including belt tension and sprocket wear. For sensors, verify that the lens path is clear and the mounting brackets have not shifted. A small misalignment compounds over time.
Security and safety demand a habit of immediate response. Frayed wiring or loose terminals on the sensor circuit require attention before they cause a silent failure. This is not about paranoia; it is about respecting the forces your door controls.
Smart upgrades offer a layer of insight. A diagnostic module can track motor current draws and sensor response times, alerting you to drift before a breakdown. Considering the frequency of load shedding in South Africa, a backup battery for the control unit is a practical addition, not a luxury.
A short checklist helps structure the session:
- Inspect all drive unit mounting bolts for torque tightness.
- Clean sensor faces and verify the alignment indicator.
- Lubricate the motor’s drive chain only as specified.
- Test the manual release mechanism with the door fully open.
Working through these steps turns a vague worry into a known condition, and that clarity is the real value of maintenance.
Cleaning and Aligning Sensors Safely
Cleaning a sensor seems simple, yet I have seen more misaligned sensors than broken motors. Switch off the power at the control panel before touching anything. Wipe the lens with a microfiber cloth and warm water. Do not use solvents; they leave a film that scatters the beam.
Alignment matters as much as cleanliness. The receiving unit needs a clear line of sight to the transmitter. Use the alignment indicator if your model has one. In South Africa, where wind and load shedding are daily realities, a sensor can shift during a power surge. Check the brackets after every outage.
- Confirm both sensor faces point squarely at each other.
- Tighten the mounting screws, but avoid overtightening.
- Test the full garage door motor and sensor cycle by pressing the wall button.
A smart upgrade, such as a diagnostic module, can alert you to signal weakening before the door refuses to close. That insight protects your family and your schedule.
Battery Backup and Power Surge Protection
Load shedding does not care about your schedule. When the power drops, a garage door motor and sensor with battery backup keeps working. That means no forced manual lifting and no compromised safety features.
Surge protection is equally critical! South African lightning storms and grid switching produce voltage spikes that can fry a control board in milliseconds. Install a surge arrestor designed for garage door motors, and test the backup battery monthly.
Smart upgrades now monitor battery health and send alerts when power events occur. You gain confidence without extra effort.
Selecting the Right Drive and Sensor Package
Motor Horsepower and Drive Type Considerations
Selecting the right drive and sensor package starts with horsepower. Residential doors typically need a 0.5 to 0.75 horsepower motor. Heavier doors, such as timber or insulated models, demand more torque. Drive type also matters. Your garage door motor and sensor package must match the door’s weight and frequency of use. A belt drive runs quieter than a chain drive. A screw drive, common in newer designs, reduces vibration. Here are the common options:
- Belt drive for quiet operation
- Chain drive for older mechanisms
- Screw drive for compact spaces
Match the drive type to your ceiling clearance. A low ceiling may rule out certain setups. The sensor pairing matters too. More powerful motors require sensors rated for higher current. Ignoring this balance leads to premature wear. Consider the environment: coastal humidity corrodes exposed drives. A sealed sensor housing adds protection to the garage door motor and sensor.
Sensor Compatibility with Smart Home Platforms
Having settled the mechanical marriage of horsepower and drive type, the discerning homeowner now faces a delicate negotiation. The garage door motor and sensor must converse with the smart home platform as smoothly as a well-versed dinner guest. Nothing disrupts suburban serenity more than a sensor that refuses to acknowledge the assistant’s command.
Compatibility is not universal. One sensor may answer Google Home while ignoring Apple HomeKit. The serious buyer should list the platforms before shopping. Options include Matter support for emerging hubs, Zigbee or Z-Wave radios for established systems, and Wi-Fi connectivity that requires no bridge.
South African load shedding makes this scrutiny essential. The best garage door motor and sensor packages retain local control and offline scheduling. Your door will still obey when the router does not. Choose the platform partnership carefully, since retrofits rarely end in genuine harmony.
Energy Efficiency and Standby Power Consumption
Standby power remains a hidden expense in any automated home. Two seemingly identical packages often reveal their differences only on the monthly electricity bill. A garage door motor and sensor that draws 12 watts while idle will consume roughly 105 kWh per year. A unit managing 3 watts of standby draw uses a fraction of that. In South Africa, where load shedding already disrupts routines, efficiency becomes a practical priority.
- Check the standby wattage rating in the datasheet
- Look for units with a dedicated low-power sleep mode
- Verify that the sensors do not force the motor into continuous polling
Drive systems with DC motors typically outperform AC alternatives in standby behaviour. The sensor pair must not compromise that advantage. A garage door motor and sensor configuration that pairs an efficient drive with sensors drawing power only during active monitoring cycles will serve the household well for years.
DIY Installation vs. Professional Setup
A South African garage often gets a garage door motor and sensor package fitted in a single weekend. DIY installation appeals to the handy homeowner, but the drive system’s complexity varies. A DC motor unit with soft start and stop is straightforward to mount. The sensor pair is the real test. A millimetre of misalignment on the track can cause the door to reverse at random moments.
Professional installers bring manufacturer diagnostic tools. They set the force curve and travel limits with the proper interface. The wiring is simple enough for most people. The configuration, however, is unforgiving. Typical DIY surprises include:
- Sensor brackets loosening after thermal expansion
- Limit switches drifting after a few dozen cycles
- Remote range dropping due to signal reflection off corrugated steel
A garage door motor and sensor that suffers alignment drift will not hold its settings for long. The difference between a weekend fitting and a calibrated installation becomes apparent within the first rainy season.
0 Comments