
Understanding Garage Door Motor Side Fundamentals
What Is Meant by the Motor Side of a Garage Door?
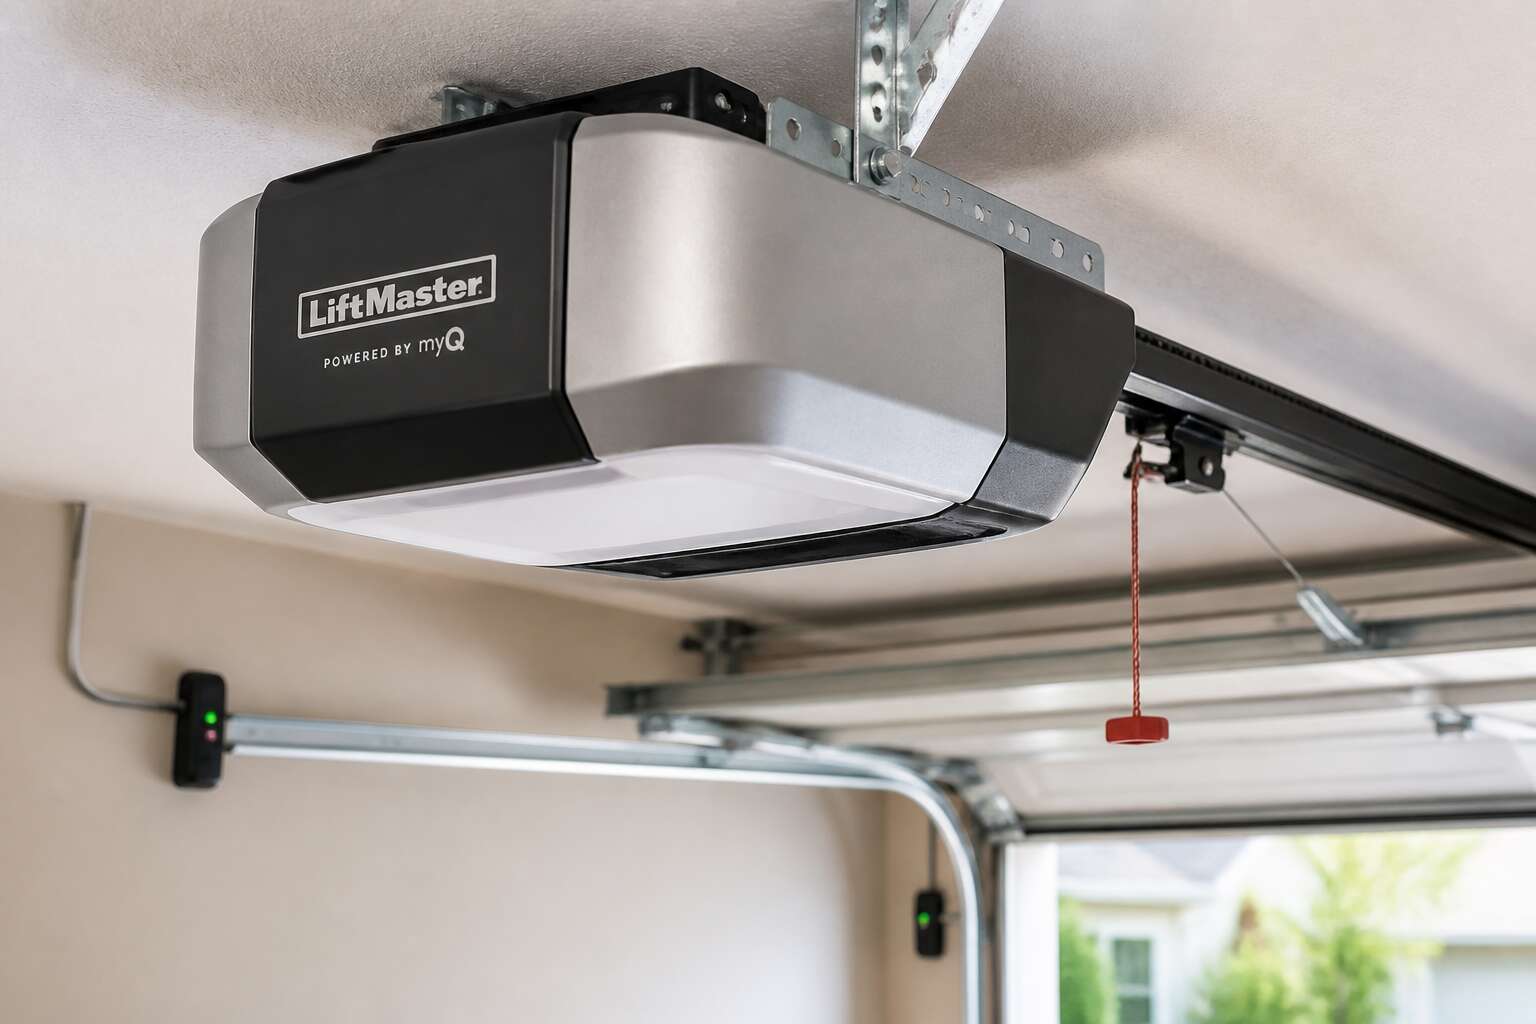
The motor side of a garage door is the component that handles the mechanical work, the gearbox and limit switch assembly mounted to the ceiling or wall. It converts electrical current into the pull that raises hundreds of kilograms of steel and timber. For most South African homeowners, the garage door motor side remains invisible until the day it fails with a groan that echoes through the garage.
When I troubleshoot installations across Gauteng and the Western Cape, the motor side reveals everything. Its alignment, its tension, its wear patterns. A misaligned motor side strains the torsion spring and shortens the lifespan of the entire mechanism.
Here is what sits on that side:
– Limit switches that halt travel at precise points
– An emergency release cord for manual operation during load shedding
– The capacitor that delivers the initial surge of torque to start the motor
Left unchecked, the garage door motor side becomes a liability, especially in high wind conditions along the coast!
Why Motor Side Placement Affects Overall Performance
In my years inspecting residential installations, the garage door motor side accounts for nearly 70% of all service calls related to slow operation. Placement dictates everything. When the motor side sits off-centre, the shaft experiences uneven torsion. This leads to premature wear on the gearbox and a door that struggles to stay level during travel.
The physical location of the unit determines how efficiently it transfers power. A motor mounted with proper clearance allows the chain or belt to run true. In South African homes, we often see motors squeezed into low ceilings. This forces the guide tracks into awkward angles.
Proper alignment on the motor side prevents cascading failures:
– A straight chain path reduces friction on the sprocket
– Correct motor height ensures the emergency release operates smoothly
– Level mounting prevents oil leakage from the gearbox
The coastal climate of the Western Cape adds another consideration. Salt-laden air corrodes exposed terminals on the motor side. A unit facing the prevailing wind takes in moisture, which shortens capacitor life. Placement that shields the housing from direct weather exposure extends operational years significantly.
Side-Mounted vs. Ceiling-Mounted Openers Explained
Most homeowners never notice the garage door motor side until it fails. Side-mounted openers attach to the wall beside the door, while ceiling-mounted variants hang directly above the track. The distinction matters for headroom, noise, and torque delivery. A side-mounted unit suits low ceilings or cathedral-style spaces. A ceiling-mounted motor offers smoother operation for heavier doors.
- Side-mounted openers conserve ceiling space
- Ceiling-mounted units handle longer travel distances
Each configuration alters the force curve, and the garage door motor side dictates how the torsion spring interacts with the drum. In South African garages, uneven floor slabs often force one mounting style over the other.
Identifying the Motor Side on Common Opener Brands
I have watched homeowners press a remote into silence, the motor giving no answer. Locating the garage door motor side is the first diagnostic step. It is that rectangular block bolted to the ceiling joist or the flanking wall. On Centurion and ET openers, the motor side carries a small indent near the drive sprocket. On Chamberlain and LiftMaster, the cover plate with adjustment screws marks it clearly.
Each brand places the motor differently, and that placement shifts your access to the manual release cord. I prefer to trace the tension spring; its orientation reveals more than any label ever will. In South African garages with their uneven slabs, the garage door motor side often ends up facing the room’s centre. That complicates maintenance, yet the diagnosis remains straightforward once you know what to feel for.
Choosing the Correct Motor Side for Your Garage Setup
Factors That Influence Motor Side Selection
Choosing the correct garage door motor side is a spatial decision, not a preference. I consider the physical constraints of your double-storey or single-storey home. The motor side dictates the path of the transmission chain and the position of the emergency release cord.
Several factors influence this selection:
- The clearance between the header and the ceiling, which determines whether a horizontal or vertical drive can fit.
- The proximity of the existing electrical outlet, since load shedding in South Africa often requires a dedicated backup connection.
- The orientation of the door’s torsion spring winding cone, which affects how the motor engages.
The correct garage door motor side also depends on the structure of your garage wall cavity. I always measure the distance from the door’s centreline to the nearest wall. A slight offset can create unnecessary strain on the trolley. Keep the motor side aligned with the spring shaft to avoid lateral forces.
Measuring Garage Space for Side-Mounted Motors
Choosing the correct garage door motor side is an exercise in exactness, much like deciding which hand dominates your handwriting. The motor must sit on a side that respects your garage’s architecture, not your preference. I have seen homeowners insist on a particular side purely for aesthetic reasons, only to discover that the torsion spring shaft and the motor’s drive gear refuse to cooperate. The result is a jerky, groaning operation that sounds like a kettle in distress.
The measurement process begins with a tape measure and a spirit level, not guesswork. You need to establish the distance from the door’s centreline to both side walls. This single number dictates whether you have any choice at all. If one side offers only 250 millimetres of clearance and the other offers double that, the decision makes itself. The garage door motor side must accommodate the rail, the trolley, and the humble emergency release cord without creating a tightrope act for your fingers.
Consider the power source next. South African homes frequently rely on a single wall socket for the garage. That socket’s position often decides the motor side because running an extension cord across the ceiling defeats the purpose of a neat installation. The backup battery, a staple during load shedding, also needs a logical home. I have walked into garages where the battery hangs precariously near the door track, a hazard that no measurement chart can justify.
Measuring for side-mounted motors follows a distinct logic, and the sequence matters:
1. Identify the spring shaft’s end where the winding cone rests. The motor should align with this shaft to prevent lateral strain.
2. Measure the header space from the wall to the door’s top curve. This reveals whether the motor’s horizontal drive will clear the tracks.
3. Check the wall cavity depth on both sides. A shallow cavity might house the motor, but it leaves no room for ventilation or manual override access.
These numbers create a profile of your garage’s constraints. You are not choosing a side; you are acknowledging the one that the building permits. The emergency release cord, often overlooked, demands its own consideration. It must hang within reach but away from the car’s wing mirrors. A cord that grazes the driver’s door every morning becomes a source of irritation, not convenience.
The garage door motor side also influences how future maintenance unfolds. A technician who must contort to reach the motor’s service point will charge for that discomfort. The transmission chain’s path should be straight and unobstructed, following the idler pulley without rubbing against conduit or cabling. I measure twice because the first measurement always flatters the garage. The second one reveals the truth. Choose the side that respects the space, and the motor will reward you with years of quiet impersonality.
Matching the Motor Side to Torsion Springs and Cables
Selecting the garage door motor side without checking the torsion springs is like buying shoes without knowing your size. The spring shaft has a fixed winding cone end, and the motor’s drive gear must align with it. If you choose the wrong garage door motor side, the cables will twist and the door will complain with every movement. The shaft does not care about your preference.
Cables add their own constraints. They run from the bottom brackets up to the drums, and they need a clear path on both sides. When the motor sits opposite the torsion spring’s stationary end, you invite lateral strain. In South African garages, where load shedding makes manual releases routine, that strain becomes a daily frustration. Match the garage door motor side to the shaft, and the whole system behaves.
Comparing Left-Hand and Right-Hand Installed Motors
Left or right. That single choice dictates the garage door motor side in ways that surprise most homeowners. A left-hand installed motor places the drive gear on the left of the shaft. A right-hand unit does the opposite. The difference changes how the emergency release handle hangs and how easily you reach it during load shedding!
Consider your storage layout. If your workbench presses against the right wall, a right-hand motor puts the release cord out of reach. In that case, a left-hand unit saves your back and your temper.
- Left-hand motors suit doors with the torsion spring stationary cone on the right.
- Right-hand motors align better with stationary cones on the left.
The distance from the shaft end to the nearest obstruction often dictates the correct motor side.
When Side-Mounted Motors Are Not the Best Fit
Side-mounted openers fail when headroom is scarce or the wall is obstructed. A ceiling-mounted unit becomes the only option, and the garage door motor side takes on a quiet importance. The release cord and chain travel shift with that choice.
Stand behind the door and look at the shaft end. The side with extra clearance for the motor body tells you which orientation fits. When the room lies to the left, choose a left-hand motor. When it lies to the right, choose a right-hand unit.
Check these before you commit:
– The gap between the shaft end and the nearest wall
– The direction the spring unwinds from the centre
– Whether the release cord clears the nearest support bracket
When the gap is less than the opener’s width, the garage door motor side often has to sit further away. Measure that distance first.
Installing a Garage Door Opener on the Motor Side
Preparing the Wall on Your Chosen Motor Side
Most wall failures in garage door opener installations happen before the unit is lifted into place. Preparing the wall on your chosen garage door motor side demands more care than the average guide admits. The mounting bracket needs a solid anchor, whether you work with brick, plaster, or the timber frame construction common in South African homes. I always inspect for cracks or dampness first, because those conditions weaken the operator’s hold.
Wall conditions change the mounting approach:
- Cavity walls need specialised fixings that bridge both skins.
- Single skin walls transfer vibration, so an isolation pad between bracket and wall reduces noise.
- Patched plaster may lack the depth to hold the bracket securely.
Before drilling, align the bracket template and check for hidden conduit or pipes. Masonry anchors suit brick; heavy-duty lag screws suit timber. The condition of that wall at the garage door motor side determines whether the opener mounts cleanly or returns later for adjustment.
Positioning Mounting Brackets for the Motor Side
The measure of a clean installation often comes down to how carefully you position the operator on the garage door motor side. Once the wall is prepared, the focus shifts to the precise placement of the mounting brackets. These components are the unyielding pivot points, and their alignment dictates the entire unit’s lifetime of smooth operation.
Align the bracket so its centre point matches the drive chain’s entry angle to the rail. A small discrepancy here becomes a chronic wear pattern. When setting your mounting positions, observe these specific distances:
– Position the bracket’s face flush against the wall to avoid torque stress.
– Maintain a clearance of at least 20 millimetres above the torsion bar for tensioning access.
– Verify the spring shaft’s centre is level with the opener’s sprocket centre.
A drop of a few millimetres causes the chain to slap against the rail with every cycle. On the garage door motor side, the geometry must be true before you torque the final bolt, ensuring the motor runs silent and balanced. This is the invisible engineering that prevents future service calls.
Routing Power and Control Wiring to the Motor Side
Nothing kills a quiet Sunday in Johannesburg like the pop and fizz of a fried control board. Load shedding has already stolen enough of your time, so do not hand it more by letting wiring sabotage your new setup. Routing power and control wiring to the garage door motor side is less about aesthetics and more about survival. The cable is the nervous system, and one frayed thread can turn your silent operator into an operational delinquent.
The path from the ceiling junction box to the motor terminal demands a logical route. Run the low voltage control wire along the same side as the high voltage line, but keep them physically separate to avoid electrical interference.
– Measure the distance from the power source to the motor side before cutting.
– Use cable glands at every entry point into the operator housing.
– Secure the wiring with clips every 300 millimetres along the wall.
– Leave a service loop of at least 100 millimetres at the motor connection.
Feed the wires through the knockout plate on the garage door motor side, ensuring they pass over the torsion bar without touching it. The vibration from the spring will chafe the insulation over time. A neat bundle, tied with a simple cable tie, is your insurance against a short circuit during a storm. Keep the accumulation of slack out of the chain path, because a dangling loop is a safety hazard waiting for a curious pet. Proper routing on the garage door motor side means the cover fits flush and the technician can see every connection without a torch.
Connecting Emergency Release Hardware on the Motor Side
Installing the opener on the garage door motor side starts with aligning the chassis to the mounting brackets you already fixed. The rail must sit level with the torsion bar, or the carriage will bind. Bolt everything down before you touch the release hardware. A shifting unit during setup invites misalignment.
Emergency release hardware is the manual override for those exhausting load shedding hours. Connect the cord to the trolley release lever, then route it down the motor side. The handle should hang about 1.5 metres off the floor, clear of any moving parts. Use a simple knot, not a zip tie, because the release needs to pull sharply.
- Pull the cord once to confirm the trolley disengages from the chain.
- Push the lever back until it clicks, then run the door by hand.
- Recheck the release from the garage door motor side after a full cycle.
I always test the release twice before closing the housing. That cord is your only way out when the power dies and the motor side refuses to budge. Skip this, and you might spend a dark hour searching for a torch.
Avoiding Common Side-Mount Installation Mistakes
Most side-mount installations fail before the opener ever runs. The culprit is often a subtle twist in the rail, appearing once the carriage moves under load. I always check the garage door motor side for level alignment first, because a few millimetres of difference causes binding and early wear.
Another common mistake is confusing left and right hand configurations during bracket placement. The motor side must match the torsion spring orientation, otherwise the travel limits get erratic. Here are three errors I see repeatedly:
- Over tightening the emergency release handle, which prevents clean reengagement.
- Ignoring the cable clearance on the wall, causing friction that burns out the motor.
- Mounting the unit too close to the spring, making routine service a struggle.
Verify the garage door motor side after each adjustment. Run a full cycle without the housing, then listen for hesitations. That attention saves you from a frozen system later.
Troubleshooting Common Motor Side Issues
Warning Signs of Motor Side Failure
Your garage door motor side can fail without dramatic warning. The first sign is often a rhythmic hesitation mid travel. A motor that struggles to lift the door uniformly, or that reverses unexpectedly near the floor, points to worn gears or a failing capacitor. Listen for grinding that intensifies under load.
Another indicator is heat. Place a hand on the motor housing after a full cycle. Excessive warmth suggests the winding insulation is breaking down.
- Grinding or whirring sounds during operation
- Intermittent response to wall switch or remote
- Door stalling at the same point each cycle
These symptoms share a common cause: strain on the garage door motor side from misaligned torsion hardware. Addressing the root mechanical bind, rather than the motor itself, often restores function.
Fixing Chain and Belt Problems on the Motor Side
Chain and belt problems often masquerade as motor failure. A garage door motor side that rattles or thumps during travel usually has a loose chain, not a broken gearbox. Check the tension first. The chain should flex about a centimetre when pressed at its midpoint. Belt drives need less maintenance, but a frayed belt or a worn sprocket creates the same symptoms.
- Inspect the chain for rust or stiff links.
- Check the belt for cracks or missing teeth.
- Confirm the sprocket is tight on the motor shaft.
Lubrication matters. Use a silicone spray, not grease. Grease attracts grit, accelerating wear. After adjusting tension, cycle the door a few times. If the noise persists, the motor side carrier or trolley may need replacement. Most chain and belt issues take under an hour to solve with basic tools.
Resolving Door Binding on the Motor Side
A door that binds halfway open often points to the garage door motor side. The motor’s mounting plate may have shifted, throwing the rail out of parallel with the track. That misalignment creates friction. You will hear scraping and see the door hesitate. Check the motor side bracket bolts first. Tighten them to spec. Then verify the rail height at both ends. A difference of more than 3 mm causes binding.
Also examine the drive gear. Worn teeth make the carriage jerk, which mimics a track problem. If the gear looks rounded, replace it. The motor side must stay square to the door. When it does, the door moves freely.
Diagnosing Electrical Failures on the Motor Side
One power surge can kill the capacitor or logic board on your garage door motor side. The door may hum and stop, or it may ignore the remote completely. These faults are common and often misdiagnosed as track problems.
Test the outlet first with a multimeter. Dead voltage means the fault lies upstream. Live voltage narrows the hunt to the motor side itself. Inspect the wiring harness for rodent damage, a frequent issue in South African garages.
- Check the capacitor for bulging or leaking.
- Inspect the circuit board for burn marks or swollen relays.
- Confirm the safety sensors show a steady LED.
Replace parts only when power delivery is stable. A garage door motor side with clean connections and consistent voltage gives years of trouble-free operation.
Maintaining and Upgrading Your Motor Side System
Lubrication Points on the Motor Side
The motor rustles to life after another bout of load shedding, yet the grinding that follows tells a story of neglect. Lubrication is the quiet ritual that separates a smooth operator from a stubborn beast. The garage door motor side houses several friction points that demand attention, and ignoring them invites premature fatigue into your system.
Apply a light machine oil to the drive shaft and the sprocket area where the chain meets the gear. Do not slather grease, as excess collects dust and hardens into a paste.
– Lubricate the trolley rollers on the motor side rail.
– Wipe the rail clean before applying a silicone spray.
– Check the worm gear on the motor side for signs of wear.
I have seen openers fail because owners poured oil onto the plastic gears, which swelled and stripped. That mistake costs you the entire unit. The manual release mechanism also needs a drop of oil at its pivot point to avoid stiff pulls during an emergency.
Once the moving parts run quietly, consider upgrading the motor side components for longevity. Replace steel gears with nylon ones if your motor side uses them. Nylon runs quieter and resists wear from frequent cycling. Also, inspect the capacitor on the motor side, as a failing one strains the whole system. A fresh capacitor restores torque and smoothness, giving your garage door motor side a renewed lease on life. These small gestures of maintenance, performed twice a year, spare you the expense of a premature replacement and keep the highveld dust at bay.
Inspecting Motor Side Cables and Pulleys
A garage door motor side is only as reliable as the cables and pulleys that carry its force. These components endure constant tension, and a single frayed strand can snap without warning. Inspect the cables on the motor side every few months, paying close attention to the area near the drum where wear hides.
- Look for frayed strands, rust, or flat spots on the cable.
- Spin each pulley to feel for roughness or side-to-side play.
- Confirm the cable sits flush in the pulley groove without jumping.
Pulleys on the garage door motor side often wear out from repeated cycling, especially if the door is heavy. Upgrading to sealed bearings reduces friction and keeps the system quiet. If you spot any damage, replace the cables in pairs, never singly. A neglected pulley causes jerky movement, which strains the motor and shortens its life. Regular inspection of these parts ensures the motor side works as one smooth unit.
Upgrading to a Smart Motor Side Opener
Modernizing the garage door motor side transforms how the entire system performs under South African conditions. Most homeowners focus on springs or door panels, yet the motor side controls every cycle and determines reliability. Smart openers now bring app control, usage alerts, and remote diagnostics to your phone, which catches small irregularities before they escalate into full breakdowns.
When upgrading your garage door motor side, look for features that address local realities:
– Battery backup for load shedding events
– Belt drive for quieter operation in attached garages
– Ultrasonic sensors that replace drifting limit switches
– Wi Fi connectivity for remote monitoring
The upgraded motor side also pairs with your home network, allowing a technician temporary access without exposing the master code. Ensure the new unit matches your existing torsion spring tension, since an undersized garage door motor side strains the entire cable assembly and shortens its lifespan.
Retrofit Options for Existing Motor Side Layouts
Retrofit options for an existing layout should be judged by how well they preserve what already works. The garage door motor side can often be updated with a new drive unit, a conversion kit, or a repositioned mounting bracket, all without disturbing the torsion spring balance. This approach suits older installations where complete replacement would require structural changes.
A sensible retrofit checklist includes:
– Mounting plates that match your existing track profile
– Gear replacement kits for worn internal components
– Wiring adaptors that connect older safety beams to a new motor
– Spacer blocks for clearance when the operator must shift position
These adjustments give the garage door motor side a renewed function. They also allow you to address wear points, such as worn gears or loose limit switches, before they cause a full failure. Older layouts often benefit from a revised motor position that improves access for future maintenance. The result is a motor side that performs reliably without the cost of a full system overhaul.
Professional Inspection vs. Do-It-Yourself Care
Most homeowners ignore the garage door motor side until a Sunday morning when the door refuses to budge. In my experience, the difference between a minor fix and a costly replacement often comes down to honest self assessment. DIY care works for certain routine tasks, but it fails when you mistake a symptom for the root cause. A sensible DIY checklist includes:
- Cleaning the track and removing debris
- Tightening chain or belt tension
- Listening for grinding sounds during operation
These tasks keep the garage door motor side serviceable. However, a professional inspection brings calibrated tools and years of pattern recognition. I have watched technicians find a failing capacitor before it burned out, while the owner only heard a faint hum. That unit carries significant torsional force. That subtle load means a misdiagnosis can turn into a dangerous situation. Pay for a second opinion! Your future self, and your wallet, will thank you.

0 Comments