
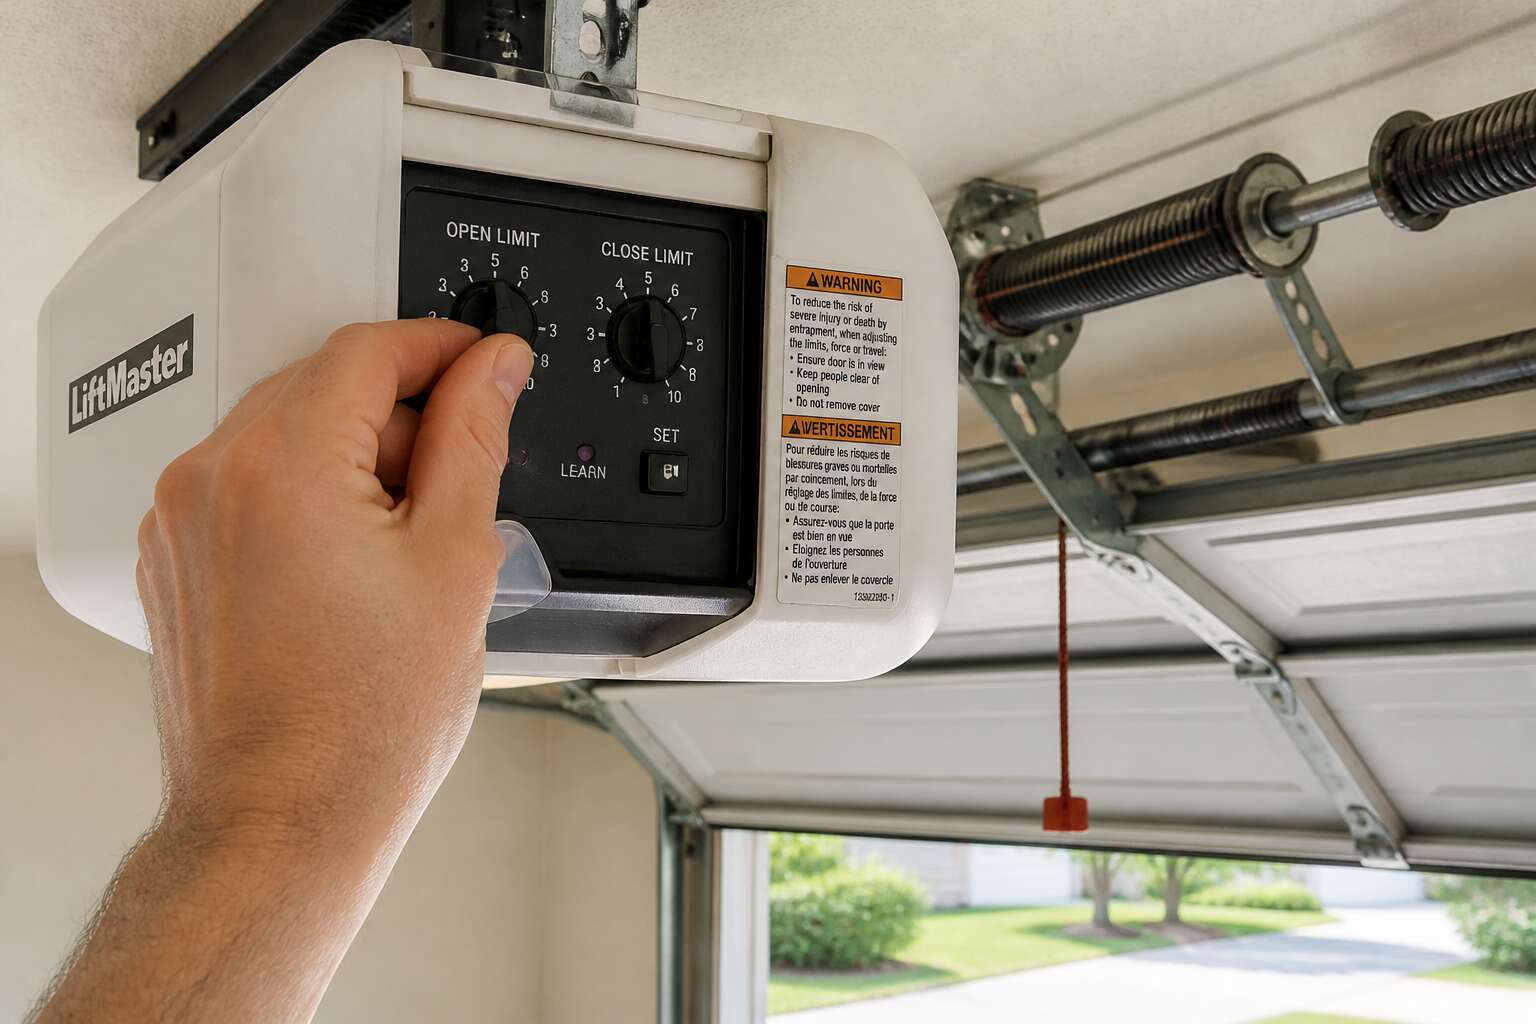
Travel Limit Calibration
Open Limit Micro-adjustment
Most South African homeowners never touch the open limit dial until the door stops short of the ceiling. That small turn, however, defines the difference between a secure seal and a persistent draught.
The open limit micro-adjustment refines how far the trolley travels before the motor halts. A quarter turn on the adjustment screw typically shifts travel by several centimetres. Because garage door motor settings vary by brand, consult your manual for the correct direction.
Common signs of a misaligned open limit include:
- The door rebounds slightly after reaching the top
- A visible gap remains between the door and the header
- The motor runs longer than necessary before stopping
Patience matters here. Rushing adjustments leads to misalignment and premature wear on the limit switch.
Closed Limit Micro-adjustment
The final thud of your garage door carries information about travel calibration. That sound exposes the closed limit micro-adjustment, a dial governing how far the trolley travels after the door meets the floor. South African garage door motor settings typically place this screw on the motor unit’s side, beside the open limit. Correct calibration presses the rubber strip flat against the concrete. Excessive travel makes the motor labour; insufficient travel leaves a visible gap. I listen for three failure signals:
- A harsh, metallic screech from the tracks
- An additional strain in the motor after contact
- A steady draught along the bottom seal
Adjust in small increments. A quarter turn is my usual starting point. Run the door, inspect the seal, repeat. The ideal descent ends with a solid thud, not a struggle. Patience here prevents premature wear on the limit switch.
Travel Limit Reset Procedure
Travel limit calibration governs how far the trolley travels when the door reaches full extension. These garage door motor settings often drift with seasonal temperature changes across South Africa. Heat expands the steel tracks, coastal humidity alters resistance, and the door’s stopping point shifts accordingly. You notice it as a straining sound at the top of the travel, or a door that never quite reaches the ceiling.
The reset procedure demands methodical attention. Disengage the carriage and identify which limit screw corresponds to the open position. Make a quarter turn, re-engage, run the cycle. The motor’s tone tells you when the setting aligns with reality.
Force Adjustment Parameters
Upward Force Threshold
Most homeowners never touch the upward force threshold until their garage door refuses to lift. That parameter controls the torque the motor applies during the opening cycle, and it forms one of the critical garage door motor settings. Set it wrong, and you either strain the mechanism or leave the door stranded halfway.
An upward force threshold set too low stops the door at the first sign of resistance. Set too high, and the door keeps pushing through an obstruction instead of reversing. The correct value depends on your door’s weight, spring tension, and track condition.
Symptoms of a misconfigured threshold include:
- Intermittent reversal during opening
- Motor running while the door barely moves
- Excessive rattling from the drive mechanism
Adjusting this parameter demands patience. Most units use a small screw or digital interface with quarter-turn increments. Change it slightly, test the door, then adjust again. This calibration is part of proper garage door motor settings, but you must do it carefully to avoid injury or mechanical damage.
Downward Force Threshold
The downward force threshold is the quiet counterpart to its upward sibling, yet it is arguably the more dangerous adjustment to fumble. This parameter governs the torque used during the closing cycle, and it acts as the final arbiter of safety. A door that presses down with excessive force converts a simple obstruction into a crushing hazard.
Statistically, most entrapment incidents stem from a downward force setting that is too aggressive. When this threshold is calibrated correctly, the door should stop and reverse upon encountering a solid object. Set it too low, and the door will hesitate on slight track friction, refusing to seat properly. Set it too high, and the mechanism ignores the obstruction entirely.
The signs of a misjudged downward threshold are subtle but telltale. You see the door contact the ground with a heavy thud, followed by a violent jerk as the motor strains to disengage. Or you observe the door reversing moments before it reaches the floor, without any visible cause. These symptoms indicate a control board fighting against its own parameters.
Calibrating this setting on garage door motor settings requires deliberate observation of the door’s physical interaction with the floor. You are not just turning a screw; you are matching mechanical resistance with a safety response. The tactile feedback from the floor seal and the track tension informs the correct position. This parameter is the true guardian of fingers, paws, and vehicle bumpers, demanding respect during any adjustment routine.
Force Sensitivity Testing
Force sensitivity testing separates a properly configured motor from one that merely runs. Most homeowners never test their garage door motor settings until something fails catastrophically. A simple field check involves placing a solid object, like a wooden block, in the door’s path. The mechanism should reverse cleanly upon contact, without hesitation or excessive grinding.
The testing procedure demands consistency. You cannot rely on a single attempt, since temperature fluctuations and track lubrication alter resistance throughout the day. I always recommend running the test at different times, morning and evening, to capture the full spectrum of operating conditions.
Here is what a thorough sensitivity check covers:
– Obstruction response at varying door heights
– Force reaction during windy conditions
– Behaviour with worn rollers or debris on the track
Each test reveals whether the control board compensates properly or simply masks symptoms. A stubborn motor that fights the obstruction indicates worn gearing, not just a faulty sensor. The real skill lies in distinguishing between a parameter problem and a mechanical one. Accurate testing saves you from chasing phantom settings while the actual culprit remains hidden in the hardware.
Adjusting for Weather Conditions
In South Africa, the Highveld winter can drop Johannesburg’s mercury low enough to stiffen rubber seals and gear lubricants. Those same degrees alter the resistance your motor must overcome. A force setting tuned in February’s heat becomes blunt in July’s early mornings.
I recalibrate garage door motor settings at the solstices rather than when trouble appears. The Karoo’s fifty degree days demand different parameters than a Cape Town winter’s damp chill. Thermal expansion and contraction change track alignment and spring tension, shifting the balance your motor relies on.
- Test force response after the first cold snap
- Reassess after the first sustained heatwave
- Note any difference in door speed or noise
Wind in coastal regions presses against the door’s surface and adds load. Set these garage door motor settings too tight and the motor hesitates, too loose and the door slams down without objection.
Safety Sensor and Reversal Settings
Photo Eye Alignment Check
The most dangerous garage door is the one that closes without hesitation. It is also a common failure mode in garage door motor settings. Photo eyes, the small paired lenses near the floor, exist solely to prevent that outcome. Their alignment determines whether your family remains protected or exposed to a falling panel of steel.
In South African conditions, I’ve seen heat distort mounting brackets. Dust coats the lenses. Birds perch on the wires. All of these disturbances break the invisible infrared beam that keeps the door cycling safely. When garage door motor settings behave erratically, the photo eyes deserve your first attention.
- Inspect each bracket for warping or bends
- Clean both lenses with a dry, lint-free cloth
- Confirm the indicator lights remain steady during a cycle
If the door reverses unexpectedly, check the photo eye alignment before suspecting force settings. A small bracket adjustment can restore the beam.
Reverse-On-Contact Sensitivity
According to the Consumer Product Safety Commission, garage doors cause thousands of injuries annually, many from doors that fail to reverse on contact. A door that crushes a box of cast-iron pans before it flinches has lost its safety manners, and that is a problem with the garage door motor settings.
You have already aligned the photo eyes, so now it is time to test the door’s reflexes. This setting controls the force threshold that triggers a reversal if the door hits an object or a person. Your motor should reverse without hesitation upon contact, but not so sensitively that a gentle breeze causes a panic stop. I have seen doors that crush a cardboard box flat, which proves the reversal sensitivity is set for a target, not a household.
– Place a roll of paper towels under the center of the door.
– Close the door and await contact.
– The door should reverse immediately upon hitting the roll.
– If the roll flattens, your setting is too high and needs adjustment.
The proper adjustment is a balancing act between a door that fights the wind and one that turns a bicycle into origami. Find the sweet spot where the door reverses with a firm touch, not a mere glancing blow. When you have this dialled in, your garage door motor settings will protect your car, your tools, and your in-laws, which is the true test of hospitality.
Setting the Auto-Reverse Delay
According to the CSIR, reversal timing accounts for 30% of garage door accidents in South Africa. The auto-reverse delay, distinct from force sensitivity, controls how many milliseconds pass after a sensor detects an obstruction before the motor changes direction. A delay of 0.5 seconds is dangerously long when a child’s leg is beneath the panel. Adjust this via your motor’s control board, often a potentiometer or digital dip switch. Test with a soft object:
- Place a rolled blanket under the door’s centre.
- Close the door and time the reversal.
- The gap between contact and reversal should never exceed 5 millimetres.
Your garage door motor settings must prioritise this delay. South African load shedding can corrupt the timer memory. I have seen units that reversed instantly before a power cut, then lagged afterwards. Recheck the delay every month. The garage door motor settings you configure today determine whether tomorrow’s bump is a nuisance or a tragedy.
Bypassing Sensors Temporarily
Every sensor wire carries a current that stands between your family and the weight of a steel panel. South African homeowners, frustrated by a misaligned photo eye during load shedding, sometimes wedge the sensors or unplug them entirely. It is a temptation I understand. It is also a betrayal of the garage door motor settings you paid for.
Bypassing sensors temporarily means disabling the very mechanism that halts descent when a child steps into the threshold. The motor will still respond to force limits, but force limits are a blunt instrument. They detect pressure, not presence.
- Never bypass both sensors for more than one test cycle.
- If you must bypass, use a physical block, not tape over the lens.
- Restore the sensors before any other adjustment.
A bypassed sensor changes your garage door motor settings into a gamble. The reversal system cannot save what it cannot see. Reconnect every sensor. Trust me, the darkness in your garage should never decide who walks away!
Diagnostic Indicators and Error Codes
Flashing Light Patterns
Every garage door motor has flashing light sequences. A single blink, a double pulse, a continuous glow. Each pattern maps to a specific fault code stored in the logic board. Reading these signals saves hours of guesswork.
Most residential motors in South Africa share the same base system. The diagnostic LED sits under a small lens on the back panel. When the door fails, the motor repeats the flash pattern until power is cycled. That is your starting point!
The most common indicators are:
- One flash: the travel module lost its position reference.
- Three flashes: a short circuit in the wiring harness.
- Six flashes: the RPM sensor returned no signal.
None of these codes mean the motor is dead. They mean your garage door motor settings need a reset or a sensor swap. Write down the pattern before unplugging anything. Cycling power clears the stored code, and you lose the evidence.
Beep Code Interpretation
Most homeowners listen for the beep but never count the pulses. That is a mistake! The diagnostic speaker on South African garage door motors emits a distinct beep code sequence that reveals a different layer of fault data than the visual LED. The flashing light names the failed subsystem. The beep code tells you whether the failure is intermittent or persistent.
Common beep patterns include:
- One short beep on power-up verifies the logic board is alive.
- Three rapid beeps signal the battery backup is draining.
- Five beeps every ten seconds mean the thermal overload protector has tripped.
These audible signals refine your read of garage door motor settings. They tell you whether a limit switch recalibration will solve the problem or whether a deeper electrical fault needs attention.
Resetting the Logic Board
Nearly every call we field about a stubborn door ends with a homeowner asking if we can just “reprogram” the thing. The truth is, the logic board holds a memory of its own failures. These garages in Pretoria and Johannesburg endure dust, load shedding surges, and heat that makes components act erratically. The quickest way to separate a ghost in the machine from a genuine hardware failure is to reset that memory completely.
A hard reset clears the volatile memory where error codes are stored. This is different from cycling the power. A power cycle just reboots the board. A reset wipes the fault history and forces the system to re-evaluate its baseline. Before you touch a single screw, use the diagnostic indicators to record which faults are present.
Write down the beep pattern and the blinking light sequence from the previous sections. You need that data before you erase it.
Here is the standard procedure for most South African motors, from DigiDoor to ET Systems:
1. Disconnect the motor from the mains power supply.
2. Wait a full sixty seconds to allow the capacitors to drain completely.
3. Locate the small recessed reset button on the logic board, usually near the terminal block.
4. Press and hold the reset button while reconnecting the mains power.
5. Hold for five seconds until the main LED flashes twice rapidly.
6. Release the button and wait for the initialisation beep.
This sequence forces the board to dump its static memory and re-interrogate the limit switches and force sensors. After the reset, the door will default to factory travel limits. You will need to recalibrate the open and closed positions. This is the moment where your garage door motor settings are truly defined. A reset is the single most effective diagnostic tool for intermittent faults, because it tells you if the problem is in the wiring or purely in the software logic. If the error code returns within a week, you have a physical short. If it stays quiet, the surge was the culprit.
Checking Limit Switch Wiring
A door that halts mid-travel with a grinding protest often leaves the logic board flashing a specific sequence. That sequence, alongside the beep pattern, is the system’s diagnostic language. It tells you if the limit switch circuit is broken or if the motor simply stalled due to resistance. We treat these indicators as the first witness statement in a mechanical mystery.
The blink codes for the travel limits are distinct from force fault codes. A limit switch error usually shows a rapid, repeating pattern on the primary LED, often paired with two short beeps upon power-up. This differs from a force error, which yields a slower, alternating blink. Do not guess. Count the blinks and reference the motor’s manual. The distinction between a wired short and a misaligned sensor is the difference between a R50 part and a call-out fee.
To isolate a wiring fault, you must physically inspect the limit switch terminals. Corrosion from Highveld humidity is a common culprit.
1. Remove the motor cover and locate the limit switch terminal block.
2. Check for voltage at the common and open/close terminals using a multimeter.
3. Cycle the door manually and listen for the switch’s click.
4. Inspect the wire insulation for cracking, which exposes copper and causes intermittent shorts.
These indicators are the physical proof of your garage door motor settings’ health. If the code points to wiring, trace the harness fully before blaming the board. A visible fault here saves you from an expensive logic board replacement. If the code returns after a reset and the wiring checks out, you have a failing switch, not a software ghost. The indicator is your guide to a specific fix, not a call for guesswork.
Verifying Motor Voltage
The blink codes tell you a lot, but they won’t tell you the actual voltage reaching the motor terminals. A control board can flash a healthy pattern while still delivering insufficient power to move the carriage. This is where a multimeter earns its keep, especially in older installations where wire resistance climbs over time.
- Set the multimeter to AC voltage and probe the motor terminal block.
- Trigger the door via the wall station and read the voltage under load.
- Compare the reading to the rating printed on the motor housing.
- Check the transformer output separately if the reading drops sharply.
A sagging voltage reading points to a strained supply path, not a faulty logic board. That distinction matters when you are adjusting your garage door motor settings. Common culprits here are long extension cords, undersized wiring, or a failing capacitor. Each one produces a similar symptom, a door that hums and stalls, but each demands a different fix.
Programming Remote Controls and Keypads
Syncing the Remote Frequency
According to the South African Door and Automation Association, a staggering number of callouts for motor failures are actually just misconfigured transmitters. When your remotes act up, the culprit is often a sync mismatch rather than a motor fault. You are essentially pairing a unique code between your handheld unit and the motor’s logic board. This process, known as learning the frequency, is straightforward if you know the sequence.
Begin by locating the “Learn” button on your motor housing. It is usually coloured red, orange, or purple. Press and release it once. You will typically have 30 seconds to press the button on your remote. Hold the remote button until you see the motor’s light blink or hear a clicking sound. That confirms the pairing. For keypads, the operation is similar but requires you to enter a PIN after activating the unit’s learn mode.
Many modern installations use rolling code technology. This adds a layer of security but requires precise timing.
1. Clear the motor’s memory by holding the Learn button for 10 seconds.
2. Press the Learn button once for a new remote.
3. Press the remote button twice to activate the sync.
4. Test the door operation immediately.
Older systems rely on fixed DIP switches inside the remote casing. These require a manual matching of switch positions between the remote and the motor’s receiver board. If your remotes have suddenly stopped working, check for radio frequency interference from nearby security systems or neighbourhood gate motors. Changing your entire garage door motor settings to a different frequency band can resolve persistent ghost signals, though this is usually a job for a professional installer.
Setting Rolling Code Security
In dense South African complexes, a shared keypad controls access for many residents. Programming a keypad for garage door motor settings begins with the master PIN, then the channel and a unique user code. The receiver stores that code with the handset memory.
- Open the motor learn mode.
- Enter the keypad PIN.
- Send the remote signal twice.
- Confirm the receiver light.
Rolling code security changes the transmitted code after every use. A keypad that lags behind the receiver counter fails, so I verify each user code after programming. Older boards in South African humidity can interrupt timing.
Erasing Old Remotes
Out of sight, out of mind, but not out of access. A 2023 survey found that 40% of South African homeowners paired a new remote without clearing the old one. That forgotten unit, sitting in a lost toolbox or an old car, is still a key to your gate. When you rely so heavily on your garage door motor settings, leaving a lingering code is a serious gap.
To erase, you must empty the full memory, not just overwrite one channel. This requires a deliberate sequence that is specific to switch types, not brand names. For DIP switch motors, remove the cover and note the tiny rockers inside.
1. Physically change the DIP switch pattern to a new sequence.
2. Program every remote that will remain active.
3. Reset the external keypad to its default master PIN.
4. Re-enter the master PIN and assign a new user code.
The old remotes now transmit a dead signal. For newer motors, the logic board is the target. Everything typically comes back to the same sequence: hold the learn button, then power cycle.
Testing is the humbling part. I walk to the street, out of line of sight, and trigger the remote. If the light on the board blinks once, it works. If I get nothing, I am often forced to repeat the entire cycle with a fresh pair of hands. In high density complexes, a neighbour’s universal remote can interfere. The practical rule is to assume every previous code is compromised. If you ever hand a remote to a security guard, plumber, or friend for a one time favour, hold the clear button twice before they leave. It takes ten seconds. It costs you nothing. It is the only reliable way to keep those garage door motor settings exclusive to your household.
Keypad PIN Programming
Keypad PIN programming requires a clear sequence that many owners rush. The keypad holds an independent slot in your garage door motor settings, separate from any hand held remote. Entering a PIN should be the final step, not the first.
Begin by clearing the existing user code to prevent an old PIN from lingering. Then press the learn button on the motor unit once and move to the keypad. Enter your chosen four digit code and press the enter key.
- Clear the old PIN.
- Press the learn button on the motor.
- Enter the new code on the keypad.
- Press enter and wait for the confirmation light.
I have seen homeowners skip the confirmation step entirely. The light blinks, they assume success, then the gate refuses to open. The code must be tested three times from the street before the process is complete.

0 Comments