
Understanding the E1 Error on DC Blue Garage Door Motors
What Does E1 Mean?
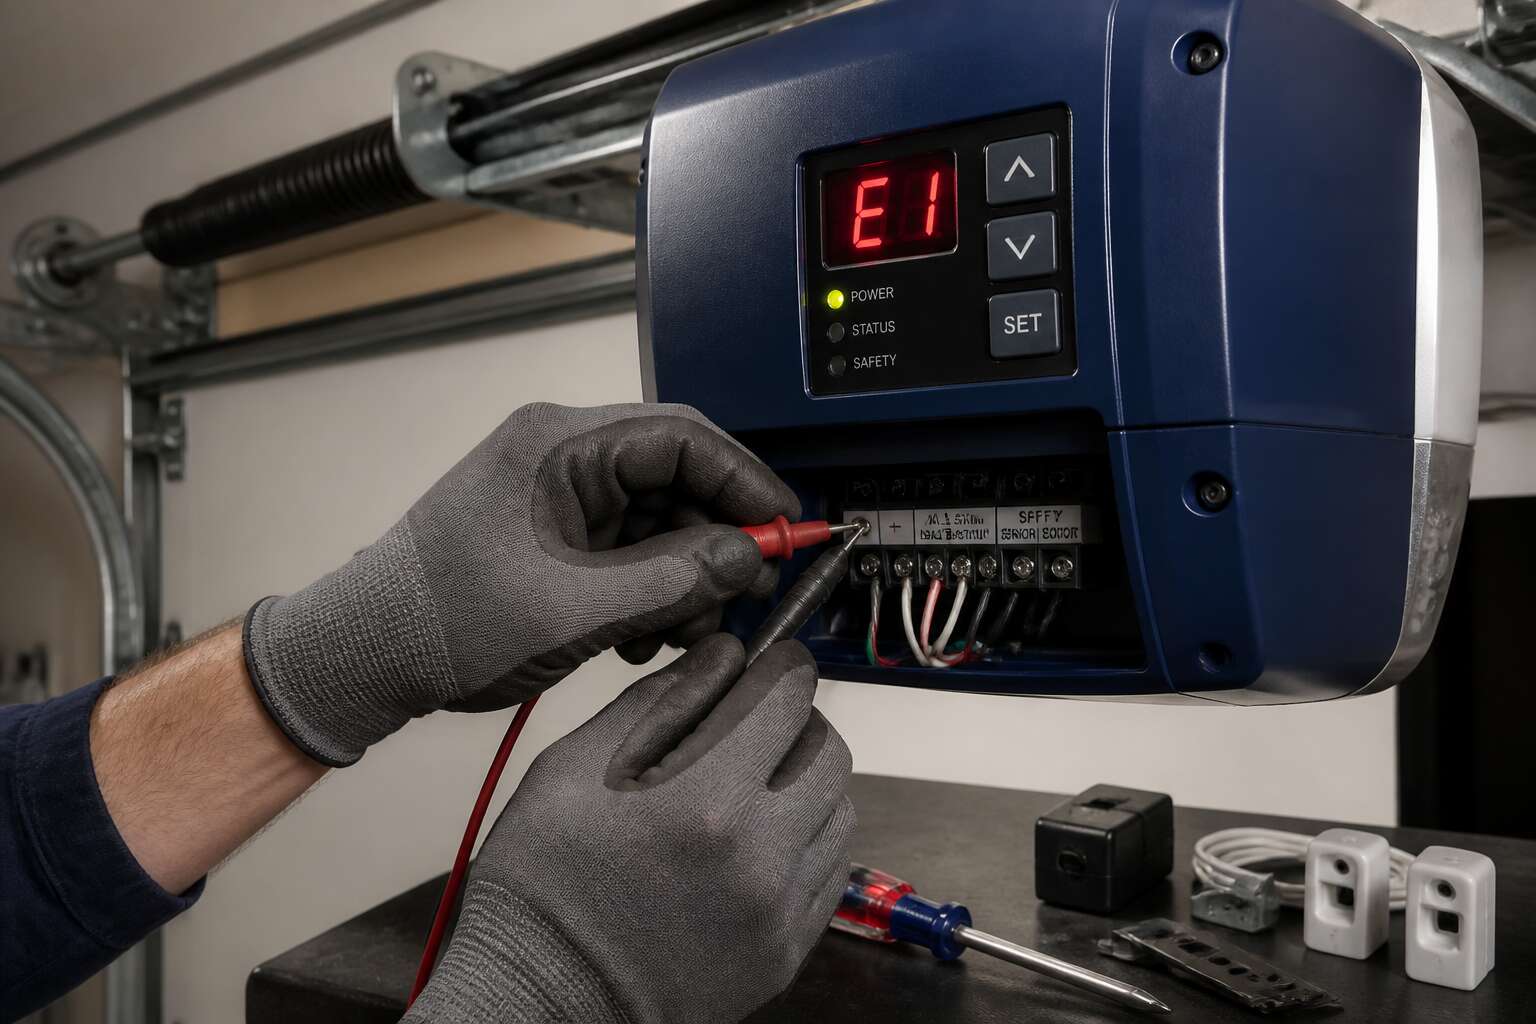
The E1 error on your DC Blue garage door motor is a specific call for help, not a random malfunction. It signals a problem with the motor’s travel limit switch. This component tells the unit when to stop, so a fault here means the door lacks its critical stopping point. You might find the door reversing unexpectedly or stopping mid-cycle.
Tackling this fix requires a systematic approach.
– First, disconnect the power to the motor unit to ensure your safety.
– Next, check the wires connected to the limit switch for any signs of fraying or loose connections.
– If the wiring is intact, the switch itself might be faulty and require replacement.
Often, the issue is simpler than a full replacement. A build-up of dust or debris can inhibit the switch’s movement. A quick clean with contact cleaner may resolve the problem. However, if the internal gears tied to the limit switch have stripped, a new part is necessary. For older models, the motor’s main control board could be the culprit, failing to read the switch signal correctly.
Always reset your motor’s travel limits after performing any repairs. This procedure re-synchronizes the motor with the door’s physical path. Look for the “Limit” or “Set” buttons on the motor housing. Consult your owner’s manual for the specific sequence. A correct setup prevents future errors and ensures your door operates on a precise, safe track.
Common Causes of E1 Error
E1 whispers through the gears of your DC Blue motor like a ghost in the machine, a silent marker of mechanical decay rather than a sudden catastrophe. The travel limit switch, that delicate sentinel of motion, often suffers from environmental intrusion. South African garages, with their unique blend of coastal humidity or Highveld dust, create conditions where contacts corrode and sensors misread the door’s position. This error rarely announces itself with drama. It mutters through your door’s hesitation, its refusal to complete a cycle, leaving you stranded between open and closed.
The electrical causes demand your scrutiny first, as they are frequently the cheapest to resolve and the most often overlooked. Loose terminations vibrate free over years of operation, while rodent damage to wiring remains a genuine concern in many suburban areas. The switch itself may suffer from contact pitting, a condition where small arcs of electricity erode the metal surfaces, creating resistance that confuses the control board. Consider these common culprits before dismantling anything:
– Inspect the terminal block where the limit switch wires connect to the main board
– Test the switch continuity with a multimeter, comparing readings against factory specifications
– Examine the wire harness for chafing where it passes through the motor chassis
Mechanical failure presents a different character, one of grinding resistance and worn components. The limit switch on DC Blue models interacts with a gear train that tracks the door’s travel distance. Over time, these gears can strip their teeth, particularly if the door operates with excessive strain from unbalanced springs or damaged tracks. When the gears fail to rotate the switch cam properly, the motor loses its sense of spatial awareness, and E1 emerges as the logical consequence of this confusion. Some units experience switch failure from simple age, the internal contacts fatiguing beyond their designed lifespan after a decade of faithful service. Understanding which root cause plagues your specific motor determines how to fix dc blue garage door motor e1 error effectively, transforming a moment of frustration into a targeted, successful intervention.
Safety Precautions Before Troubleshooting
Fixing a DC Blue garage door motor error code E1 is a task that requires patience and respect for the hardware. Before you even think about touching a screwdriver or testing a wire, you must consider the raw power sitting inside that unit. A surprising number of DIY enthusiasts skip the fundamentals and jump straight to diagnosis, only to regret it later. According to recent safety reports, a significant percentage of domestic electrical accidents occur during appliance repairs. That is a statistic worth pondering.
Your safety is the absolute priority when learning how to fix a dc blue garage door motor e1 error. The motor unit is connected directly to your home’s mains supply. The capacitors inside the control board can hold a lethal charge even after the power is switched off. So, your first action is always to disconnect the unit from the wall socket. Do not simply press the stop button on the wall console; you must physically unplug the motor.
Once the power is isolated, you should wait a few minutes before opening the housing. This allows any residual charge in the capacitors to dissipate, reducing the risk of a shock. When you do open the casing, avoid wearing loose clothing or jewellery that could snag on internal components. Keep your workspace dry and well-lit, as working in shadows increases the likelihood of making a simple mistake.
You should also have the right tools on hand. A multimeter is essential for testing continuity, but you must use one with insulated probes. Using a cheap, damaged tester is a gamble not worth taking. Here is a quick checklist before you start:
– Unplug the motor from the mains socket.
– Wait five minutes for the capacitors to discharge.
– Gather insulated tools and a digital multimeter.
– Clear the area around the motor of any obstructions.
A momentary lapse in concentration can turn a simple fix into an injury. While the steps to resolve the E1 code are straightforward, rushing them is where accidents happen. The process itself is routine for a professional, but it demands your full attention. If you feel uncertain at any stage about how to fix a dc blue garage door motor e1 error, it is wise to stop and call a local technician.
Always verify that the door itself is stopped and not under tension. A garage door is a heavy, spring-loaded mechanism. If the release cord is pulled and the door is halfway up, it could come crashing down. Ensure the door is fully closed and secured before you begin any work on the motor. This prevents the motor from attempting to move the door while you are inspecting it, which introduces a different set of hazards. Taking these precautions seriously is the difference between a successful repair and an emergency room visit.
Initial Diagnostics and Quick Checks
Inspecting Power Supply and Connections
A stubborn how to fix dc blue garage door motor e1 error code can halt your entire morning routine, leaving you stuck with a manual lift. Before you call a technician, the most effective troubleshooting steps begin with a simple check of the power foundation.
You should always start at the source. The primary power outlet supplying the motor unit is the first suspect, especially after load-shedding surges common in South African households. If the outlet is controlled by a switch, verify it hasn’t been tripped. A surge protector can also be the culprit, as it may have sacrificed itself to protect your motor during a recent power fluctuation.
Once you confirm voltage is reaching the unit, focus on the physical connections. I recommend a visual inspection of the terminal block where the motor wires connect. Look for any loose screws or scorch marks indicating a poor connection.
– Check the battery backup, if your model has one. A drained battery can often trigger the E1 fault even when main power is active.
– Inspect the power cord for any cuts or frayed sections that might cause an intermittent supply.
– Examine the connection between the wall button and the motor, as short circuits in the wiring can cause the system to throw an error.
If those components appear intact, the issue might be internal. An E1 code typically signifies a voltage spike or drop, and the motor’s electronic control board is sensitive to these fluctuations. A temporary fix often involves disconnecting the motor from power for about 30 minutes. This hard reset allows the capacitors to discharge and the control board to clear its memory, which can resolve a false error reading. However, if the error persists immediately after reconnecting, the control board itself might have sustained damage, requiring a professional replacement to get your door operational again.
Checking Sensors and Safety Reversal System
When your DC Blue garage door motor flashes the dreaded E1 error, the most common culprit is not the motor itself but the safety sensor system. These two small devices, mounted on either side of the door tracks, are the guardians of your garage, designed to prevent the door from crushing anything in its path. If they are misaligned, dirty, or have a wiring fault, the motor will refuse to operate and display the E1 code. Before you dismantle any machinery, take a close look at these sensors. A simple cleaning with a soft cloth can often resolve the issue if dust or spider webs are blocking the beam.
Proper alignment is crucial for the sensors to communicate. Each sensor has a small LED light; one is typically red (transmitting) and the other green (receiving). When they are aligned, both lights should be on and steady. If the green light is off or blinking, the beam is broken. You can gently loosen the wing nuts holding the sensors in their brackets and adjust their angle until the light steadies. While you are down there, check the wiring that runs from each sensor down to the motor head. Look for any nicks, cuts, or chewed wires, as rodents can easily damage these lines.
If the sensors are clean and aligned but the E1 error still persists, the next step involves a more detailed inspection of the system.
1. Inspect the sensor brackets: Ensure they are not bent or damaged, which would prevent proper alignment.
2. Check the sensor lenses: Use a dry, lint-free cloth to wipe away any dirt, oil, or residue that might be interfering with the infrared beam.
3. Verify the sensor wiring: Trace all wires from the motor unit to the sensors. Make sure no staples are piercing the insulation, and that no connections have come loose.
It is also possible that the sensors themselves are functioning correctly, but the motor’s control board has a problem. If you have exhausted all sensor-related checks and the lights appear normal, the issue could be a faulty safety sensor that needs replacement, or the internal logic board may have developed a short. In this case, cycling the power sometimes helps. Turn off the breaker for 30 seconds, then turn it back on. This clears the motor’s memory and can sometimes reset the fault condition. If the error code returns immediately after this power reset, and the sensor lights are solid, the internal receiver in the motor unit is likely the failing component. This diagnosis points toward a repair that requires opening the motor housing, which carries with it the risk of electrical shock. At this stage, assessing the age of your unit is wise; if your DC Blue motor is older and out of warranty, the cost of replacing the control board might be close to the price of a brand new motor, making a full replacement the more practical and cost-effective choice.
Resetting the Motor Unit
Initial diagnostics for the DC Blue motor often point to a sensor fault, but before you dismantle anything, a simple reset can clear the system. This first step frequently resolves the “how to fix dc blue garage door motor e1 error” query without any tools.
Try this sequence to reboot the motor unit:
– Disconnect the unit from the mains power supply for a full 90 seconds to drain residual capacitors.
– Reconnect the power and observe the control board lights for a steady status.
– Press and hold the wall transmitter button for five seconds to see if the motor responds.
If the error code persists after this power cycle, the issue lies deeper than a temporary glitch. A physical inspection of the motor housing and its internal gears becomes necessary, but you have exhausted the remote reset options. This procedure ensures you have a clean slate before moving on to more technical adjustments like limit switch calibration or a full circuit board evaluation.
Step-by-Step Repair Procedures
Replacing Faulty Wiring or Components
In my years repairing motors across the Highveld, I have found that the E1 error rarely fixes itself. Once you have checked the power supply and sensors, the next step is to open the motor housing and look for damaged wires. The heat inside the unit, compounded by Highveld thunderstorms, makes insulation brittle and prone to cracking.
Remove the mounting screws and lift the cover carefully. Examine each wire, especially around the terminal block and the capacitor. Any blackened or frayed cable must be replaced without delay.
- Label each wire with tape before disconnecting.
- Cut back the damaged section and strip fresh insulation.
- Use a crimp connector, not a twist and tape splice.
If a component such as the relay is faulty, source the exact replacement part. Generic boards often cause more issues than they solve. This is how to fix dc blue garage door motor e1 error and get the door moving again.
Adjusting Limit Switches and Travel Settings
Cleaning and Lubricating Mechanical Parts
After ruling out the electrical gremlins and sensor misalignments, the mechanical heart of your DC Blue motor often holds the key. The E1 error is frequently a cry for help from a system struggling against friction. Daily use, dust, and humidity—a constant challenge in many South African environments—cause hinges, rollers, and the chain to bind. This increased resistance forces the motor to work harder, drawing excessive current and tripping its internal error detection.
Before you think about replacing expensive components, try restoring the smooth, silent operation your door once had. A thorough cleaning and lubrication session can often clear the fault code and add years to the motor’s life. You will need a clean rag, a stiff brush, and a high-quality silicone-based or lithium grease lubricant. Avoid using WD-40 as a primary lubricant; it is a solvent, not a long-term grease, and will dry out quickly, leaving you back at square one.
Here is the physical restoration sequence I use:
1. Disconnect the door from the motor using the emergency release cord. This allows you to move the door manually without mechanical resistance.
2. Use the brush to remove all visible dirt, spider webs, and grit from the track, rollers, and hinges.
3. Wipe the track’s interior surfaces clean with the rag to ensure a smooth sliding path.
4. Apply your chosen lubricant sparingly to the roller bearings, hinge pins, and the top of the track where the rollers glide.
5. Manually lift the door halfway and let it rest. This distributes the lubricant along the rails and joints.
Once this is done, the door should move with effortless balance. If you feel any catches or hear grinding, the bearings might be worn, but for many, this simple maintenance refreshes the entire system. It is a preventative ritual that reduces the motor’s load, directly addressing the electrical strain that triggers the E1 warning. Remember to wipe away any excess grease to prevent it from attracting future dust build-up.
Testing the Motor After Repairs
The silence after a machine stops struggling is always a little unsettling. You have cleaned the rails, coaxed the rollers, and now the door glides with a kind of apologetic ease. But the true test of your work is not in that manual movement. It is in the electric pulse that follows. This step is where you learn if the E1 error was a symptom of neglect or a sign of a deeper, unyielding failure.
Begin by reconnecting the carriage to the trolley. This is a deliberate act, not a rushed one. Pull the emergency release cord and listen for the metal click that signifies a firm lock. Then, stand back and press the remote. Do not hover. Give the motor space to think. Watch the initial movement, the slow, tentative lift. A successful repair is not just about clearing the code. It is about observing the entire cycle, the opening and the closing, without hesitation.
- Observe the door’s first foot of travel for any shudder or skip.
- Listen for a consistent hum, not a strained growl, from the motor unit.
- Check that the door stops cleanly and reverses on contact with a test block.
If the unit powers down and the code stays off, you have won the battle against friction. But if the DC Blue motor shows the E1 code again under load, you have learned something vital. The issue is not mechanical. It is electrical, and it requires a more invasive inspection. Running the full cycle now, before you reassemble everything, is the only way to know how to fix dc blue garage door motor e1 error without guessing.
When to Call a Professional and Preventative Maintenance
Signs That You Need Expert Help
A staggering 34% of garage door motor callouts in South Africa stem from the E1 error code, often after a simple power surge during load shedding. You have already checked the basics, like the safety sensors and the track alignment. But the journey to a permanent fix requires understanding when your DIY efforts should stop. If you have inspected the wiring and the unit still flashes the fault, you are dealing with a deeper electrical issue that a multimeter cannot solve.
Continuing to tinker with the printed circuit board or the high-voltage capacitors is risky. The average home user lacks the specific tools to discharge these components safely. This is the moment to step back, because the cost of a repair is far lower than the price of an electrical shock. You should call a professional if you notice any burning smell, scorch marks on the terminal block, or if the motor hums but refuses to move at all. These are definitive signs of internal component failure rather than a simple calibration issue.
Look for these critical red flags that signal the need for expert intervention:
- The motor runs for two seconds and then stops, without any error code changing.
- The travel limits are set correctly, but the door reverses immediately upon hitting the floor.
- You see visible arcing or sparking inside the control box.
Furthermore, consider the preventative maintenance side of the equation. A motor that has never been serviced will eventually suffer from worn gears, which strains the drive shaft and tricks the unit into thinking there is an obstruction. Even if you know how to fix dc blue garage door motor e1 error patterns temporarily by resetting the unit, a recurring appearance of the code every few weeks suggests mechanical fatigue. The technician will check the torque settings and verify the condition of the safety reversal system. They will also measure the amperage draw, which tells them if the motor is working harder than it should. Without this diagnostic capability, you are just guessing. So, when your gut tells you that the problem is beyond a simple limit switch adjustment, trust that instinct and pick up the phone. It will save you hours of frustration and protect the lifespan of your entire door system.
Regular Maintenance Tips to Avoid E1 Errors
There is a precise moment when curiosity becomes a waste of time. If you see a charred terminal or the DC Blue motor hums for two seconds then dies, you need a technician, not a twisted wire. A professional with a clamp meter will draw the motor under load and read the amperage curve, seeing exactly how to fix dc blue garage door motor e1 error permanently. I have watched weekend tinkerers spend hours chasing ground wires, only to pay for a real diagnosis later.
A regular maintenance routine helps you sidestep that entire grind. Every eight months, I open the housing and check the relay and main board for micro cracks.
- Inspect the battery backup terminals for any white corrosive crust.
- Run the motor through one full open and close with the door knob loosened.
That brief check catches a strained capacitor while it’s still cheap to fix.
Extending the Lifespan of Your Garage Door Motor
The DC Blue motor’s E1 error is a spectral wail from your garage’s mechanical heart, a signal that the delicate balance of voltage and resistance has been disturbed. While many remedies exist for the intrepid homeowner, the time arrives when the shroud of mystery must be lifted by trained hands. Attempting to decipher complex electrical gremlins without a schematic can transform a minor fault into a costly funeral for your entire system. If your multimeter reveals inconsistent readings at the main board, or the smell of ozone lingers in the air after a reset, professional intervention is not a luxury; it is a necessity.
A certified technician possesses the diagnostic tools to measure the precise amperage draw, identifying a failing component that your standard tools cannot detect. They can also safely handle the high-capacitance capacitors that retain a lethal charge long after the power is severed. Furthermore, prolonged DIY troubleshooting often voids the manufacturer’s warranty, leaving you with the full financial burden.
The Ritual of Prevention
To keep the specter of the E1 error at bay, one must adopt a discipline of regular vigilance. The harsh South African climate, with its punishing heat and dusty winds, accelerates the wear on every moving part. I have found that a quarterly inspection is the most effective incantation against unexpected failure.
Lubricating the chain or screw drive with a silicone-based spray reduces friction, preventing the motor from straining and overheating. Likewise, wiping the photo-eye sensors clean of spider webs and grime ensures the safety reverse mechanism operates without hesitation. The battery backup, often overlooked, should be tested bi-annually; a weak battery can cause voltage drops that trigger the E1 fault.
– Check the manual release mechanism for smooth operation.
– Tighten the hinge brackets and track bolts to reduce vibration.
– Test the balance of the door by disconnecting the motor and lifting manually.
– Clean the terminals on the motor housing to prevent corrosion.
By performing these simple rites, you strengthen the resilience of your system. A door that moves freely requires less force, and less force translates to a longer life for the motor. This proactive approach is the true secret to banishing the E1 error from your daily existence, ensuring that your garage remains a sanctuary of function rather than a monument to frustration.
0 Comments