
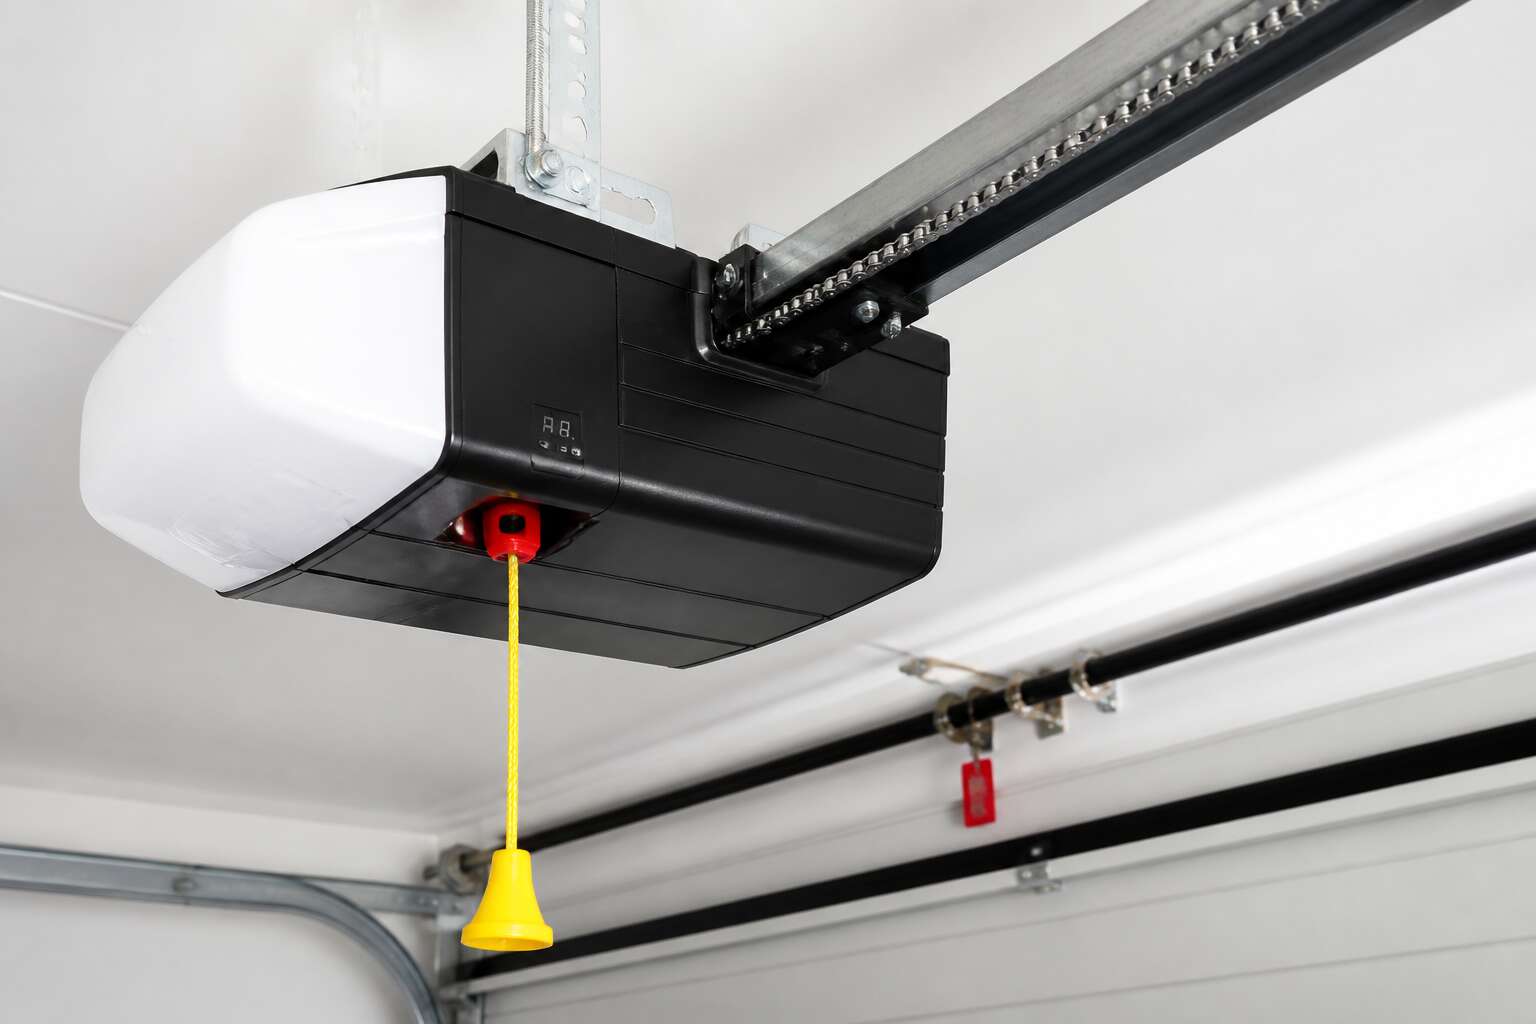
Inside the Power Unit
The Role of the Electric Motor
The electric motor inside the power unit does not announce itself. It simply turns. That rotation drives the gears, threads the chain, and lifts the door. For a garage door motor assembly, this motor is the origin of all motion. Without it, the torsion springs and tracks remain idle. From the first jolt of current to the final reversal, the motor responds to signals without delay. It reverses with a shudder when an obstruction is detected. It hums into silence when the door settles.
The motor’s work is unglamorous but precise. It must start, sustain, and stop. Each phase demands different torque. To understand any garage door motor assembly, you must understand the motor’s duty cycle. A common residential unit runs for brief intervals, then rests. This pattern prevents overheating. Commercial setups differ, but the principle remains the same. The motor executes its task quietly.
Gearbox and Drive Gears
The motor turns, but turning alone lifts nothing. Between the motor’s shaft and the torsion bar sits the gearbox, a cast metal chamber where speed becomes force. The drive gears mesh in a sequence of reductions, each tooth biting into the next. A worm gear, helical and patient, spins against a larger wheel. Revolutions per minute die here so that torque can live.
The gears demand lubrication. Old grease hardens into a crust. Steel teeth then grind against each other, and the whole garage door motor assembly begins to shudder. Regular inspection matters, because a worn tooth changes the timing. The door stalls mid-track, and the motor complains. But the gears absorb the abuse first.
Limit Switches and Control Board
The limit switches and control board command the garage door motor assembly. A single misaligned switch can turn a quiet routine into a slammed door. In South Africa, power surges place extra stress on the control board, often before any gearbox fault appears.
The control board coordinates timing, safety reversal, and remote signals. Limit switches, either normally open or normally closed, physically detect the door’s position. The sequence is simple:
- The door opens, and the control board energises the motor.
- A limit switch opens as the door reaches full travel.
- The signal cuts power immediately.
A failure in any step causes erratic movement. These components wear faster than the drive gears. Regular checks of the control board prevent expensive replacements.
Capacitors and Starting Components
Somewhere within your garage door motor assembly, a small cylindrical component performs a task that seems almost magical. It stores energy and releases it in a sudden, powerful burst. This is the start capacitor, a component that gives the motor the initial torque needed to lift a heavy door from a dead stop. Without this jolt, the motor would simply hum and stall, drawing excessive current until the thermal overload trips. The run capacitor, its quieter partner, then takes over to keep the motor spinning efficiently. In South Africa, where grid voltage fluctuates, these components work hard.
Capacitors degrade quietly. Heat is their primary enemy, and consistent summer temperatures accelerate the breakdown of their internal dielectric. When a capacitor fails, the symptoms are often mistaken for a motor fault. The door might move sluggishly, or it might not move at all.
– Visible bulging or swelling of the capacitor casing.
– A distinct burning smell from the power unit.
– The motor buzzing but refusing to rotate.
These failures are common reasons for garage door repair calls. The lifespan of a capacitor is not infinite, typically ranging from five to ten years. Testing them requires a multimeter, but visual inspection often reveals the problem immediately. Replacing this component during routine maintenance is a cost effective way to extend the life of the entire unit. The energy stored is considerable, so discharge the capacitor safely before handling it. These components are the silent heartbeat of the system, working until the very moment they are not.
Key Components That Drive the System
The Trolley and Rail Assembly
Some say a garage is the heart of the home, but the true soul lies in the machinery that grants it access. The rail assembly is the spine of the entire operation, a fixed path that transforms raw, motor-driven torque into linear force. Without a properly aligned rail, even the most powerful motor becomes useless, its energy lost to friction and binding. This silent steel track bears the full weight of the door as it glides overhead, a testament to engineering resilience.
The trolley is the courier, a carriage that shuttles back and forth along the rail. It is the physical connection between the chain or belt and the door’s top bracket. When the carriage moves, it pulls, and the door follows, reversing the process on the descent to seal the threshold once more. The marriage of these two components must be precise, as any hesitation here translates to a grinding halt or a dangerous slamming motion.
The rail itself is often sectional, a modular design of steel or aluminum that allows for installation in tight spaces. The track must remain perfectly level and true, as the entire garage door motor assembly depends on this foundation.
– The chain or belt drive loop connects the motor gear to the trolley.
– Tension on this loop must be regularly checked to prevent slippage.
– The limit switch flags on the rail tell the system when to stop.
A warped or misaligned rail introduces resistance, forcing the motor to overwork. That extra strain shortens the lifespan of the entire garage door motor assembly, turning a small installation error into a costly repair. It is a quiet, persistent pressure that wears down the gears over time. The rail does not move, but it endures, a constant reminder that the smoothest operations are often the ones we never notice.
Drive Belt and Chain Mechanisms
Between the motor housing and the trolley lies a critical handoff. The drive belt or chain wraps around the sprocket and converts rotational force into linear travel. A belt uses reinforced rubber with teeth that grip precisely. A chain relies on interlocking metal links, durable but noisier. Both suffer from wear and stretching over time, which changes how the system performs.
Regular inspection of this closed loop is non-negotiable for any garage door motor assembly. Slippage causes the door to stall or drift mid-travel. A slack chain can jump teeth at the worst moment, leaving the door stuck halfway. Correct tension is the dividing line between years of smooth service and premature failure.
- Belt drives run quieter and need less attention.
- Chain drives handle heavier doors and extreme temperatures.
- Both require periodic lubrication at the contact points.
Coupling and Sprocket
The coupling and sprocket perform a direct transfer of power between motor and drive belt. The coupling joins the motor’s output shaft to the gearbox input. It absorbs small misalignments that develop as the structure settles over the years. The sprocket is the toothed drum that connects with the belt or chain. Its tooth profile must match the pitch of the belt or chain exactly. A worn sprocket will chew through a new belt or chain in short order. Common signs of wear include:
– A shiny line worn into the base of each tooth
– A clicking sound when the door reaches full travel
– Visible pitting on the sprocket’s side surface
These small components carry the full strain of each cycle. When they fail, the entire garage door motor assembly stops mid-cycle.
Emergency Release Cord
The emergency release cord is the manual override that decouples the trolley from the carriage. When the power fails, a single pull lets you operate the door by hand. This cord is often overlooked, yet it can save you from being trapped inside a dark garage. It is a small but essential part of any garage door motor assembly.
Here is a key detail: the cord must be pulled straight down, not at an angle. Many release mechanisms jam when pulled sideways. Once released, the trolley slides freely along the rail. To reengage, you simply run the door a few inches, and the mechanism snaps back into place.
Check the cord monthly. Look for fraying, a cracked handle, or signs of rust near the attachment point. A tangled cord can fail right when you need it most. Replace a worn cord immediately to keep your garage door motor assembly reliable.
Remote Receiver and Antenna
Imagine a signal traveling through brick, timber, and steel, all to deliver a simple command. The remote receiver is the silent radio operator inside your system. It listens on a specific frequency, often 433 MHz, waiting for the correct rolling code from your remote. This code changes every time, so a recorded signal from a thief cannot be replayed to open your door. The receiver interprets the incoming signal and sends a command to the logic board to activate the motor, setting the entire garage door motor assembly into gentle motion.
The antenna is the receiver’s physical link to the air. It is a thin wire, usually hanging from the motor unit. Its position determines how well it collects signals. If you have to stand right next to the door for your remote to work, the antenna may be tucked against the metal chassis, or obstructed by a steel beam. The radio waves need a clear path. Extending the antenna downward and away from the metal parts of the motor housing can dramatically improve your range.
Several factors quietly degrade receiver performance, which are often overlooked when diagnosing a faulty garage door motor assembly:
- Weak remote batteries that lower the signal strength closer to the receiver’s sensitivity threshold.
- Sunlight and heat warping the remote’s internal circuit board over time.
- Other wireless devices nearby, such as older Wi-Fi routers, that create interference on adjacent frequencies.
The receiver board is a dedicated piece of circuitry. A surge from a lightning strike can fry it instantly, even if it did not hit your house directly. Failure of this component often presents as a completely dead motor, which mimic a primary power issue. Testing the receiver typically involves swapping in a known-working remote. If the second remote works, the first remote is at fault. If neither works, you can inspect the antenna connection and the board itself for visible wear. The receiver and antenna are an unassuming pair, yet they form the crucial command input for every operational cycle of the modern assembly.
Step-by-Step Installation Guidelines
Preparing the Ceiling Mounting Bracket
A loose ceiling bracket explains more garage door failures than any worn gearbox. I have seen perfectly fine motors abandoned because the mounting point shifted a fraction of a millimetre. Preparing that bracket is the first step in any proper garage door motor assembly.
The task requires careful measurement and precise drilling.
- Find the ceiling joists above the door’s centre line.
- Mark the exact hole positions with a pencil and spirit level.
- Use a 10mm drill bit for the pilot holes, then fit the bracket.
- Tighten each bolt in a crisscross pattern to avoid warping.
If your ceiling slopes, add washers to shim the bracket level. Never guess this step. The alignment of the entire garage door motor assembly depends on that perfectly flat surface. Take your time, and check for hidden pipes or cables with a detector.
Attaching the Rail to the Motor Unit
Attaching the rail to the motor unit demands precision in any garage door motor assembly. First, locate the drive gear on the motor housing. Slide the rail’s coupling over it, but never force it! The rail should sit flush against the mounting flange. Here is a sequence that saves time and tears:
- Align the rail’s slots with the bolt holes on the motor unit.
- Insert the bolts and spin them in by hand until finger tight.
- Pull the rail forward to check for play, then tighten the nuts with a socket wrench.
- Final torque should be between 15 and 20 Nm.
Every millimetre matters. A skipped step here creates a chain of vibrations that wears out the drive gears. A motor unit can crack its housing simply because the rail sat an eighth of an inch off. This is where the reliability of your garage door motor assembly truly takes shape.
Connecting the Drive Chain or Belt
Connecting the drive chain or belt demands the same care as the gearbox itself. In any garage door motor assembly, the chain must thread over the drive sprocket and around the idler pulley at the rail’s far end. The tensioner should then be adjusted gradually. A slack chain slaps against the rail housing, sending stress waves into the gearbox. Over-tensioning drags on the motor and accelerates bearing wear.
Technicians often follow this sequence:
– Thread the chain over the drive sprocket first, then the idler pulley
– Leave a sag of roughly 10 mm before tensioning
– Use the tensioner bolt to take up slack in small increments
– Tighten the lock nuts only after the belt sits true
The drive must move freely without metallic chatter. A properly tensioned belt transfers every newton of torque to the trolley without losses. That quiet transfer characterises a healthy garage door motor assembly.
Wiring the Safety Reversing Sensors
Wiring the safety reversing sensors is where patience goes to die. Two small boxes sit on opposite tracks, and if you misalign them, your garage door motor assembly will refuse to move. The sensors fire an invisible infrared beam across the opening. When anything breaks that beam while the door is closing, the motor instantly reverses. Simple concept. The wiring, however, demands precision.
Mount each sensor roughly 15 cm above the floor. Strip the low voltage wires and connect them to the terminals. Most units run three wires per sensor: power, ground, and signal. Mixing up ground and signal invites a short circuit that can damage the control board of the entire garage door motor assembly.
Run the wires through the clips along the rail, keep them clear of the trolley, and secure connections with terminal blocks. Test by breaking the beam with your hand during a close cycle. If the LED indicator does not glow solid, the sensors are misaligned. Trust the light, not your urge to tweak the brackets until something clicks.
Setting the Travel Limits and Force
Most homeowners never touch the travel limit dials until the day the door refuses to close all the way. That is the moment you learn patience. Setting the travel limits forces you to watch the door move in real time, inching toward a position that exists only in the control board’s logic. I have seen this play out. You are not guessing. You are teaching the garage door motor assembly how far the door should travel and how much force is acceptable.
Here is a solid sequence:
- Loosen the limit switch screws but do not remove them.
- Turn the travel adjustment screw clockwise for down, counterclockwise for up.
- Cycle the door manually until it reaches the correct position.
- Tighten the screws and test the force setting.
A sloppy travel limit invites the door to slam. A force setting too high turns the garage door motor assembly into a hazard. Calibrate with the door balanced first, then adjust.
Diagnosing and Fixing Operational Problems
Motor Runs But Door Doesn’t Move
A motor that keeps spinning while the door stays put is the most misunderstood garage fault. The motor running does not mean the drive is turning. I always check this first. With the power disconnected, lift the door manually. If it moves freely, the issue sits inside the transmission.
The garage door motor assembly transfers torque through a sequence of metal and hardened plastic parts. When one part shears, the motor spins free. A stripped drive gear produces a whirring sound without the usual mechanical clatter.
Listen for the difference. A motor under load carries a strained, low-pitched hum. A motor spinning against no resistance sounds lighter, almost airy. That acoustic clue, paired with a visual check of the drive shaft, reveals which component inside the garage door motor assembly has failed.
Excessive Vibration or Noise
Excessive vibration from a garage door motor assembly often becomes obvious before you can trace its origin. The hum changes pitch, the rail shudders, and the ceiling vibrates along with it. I have watched many doors in Gauteng and the Cape while the motor case vibrates. The cause is mechanical, not electrical.
Start with the obvious. Loose mounting bolts amplify any imbalance. Check the tension on rail brackets and the torsion spring counterbalance. A worn sprocket or a bent shaft creates a rhythmic thump that travels through the frame. Listen for that beat at different points along the rail.
- Worn motor bearings that grind under load.
- An out of round drive gear that makes the assembly pulse.
- Misaligned belt guides that slap against the housing.
Disengage the emergency release and run the motor alone. If vibration persists with no load, the source sits inside the garage door motor assembly.
Intermittent Operation or No Response
Intermittent operation tests your patience more than a complete failure. A garage door motor assembly that works three times, then goes silent for no obvious reason, usually has a thermal overload tripping. The motor heats up after repeated cycles, the thermal switch cuts power, and you wait. Thirty minutes later, it works again. That pattern repeats because the underlying cause, often an old motor or high friction in the system, remains unchanged.
No response at all points to a different set of culprits. In my experience, checking the mains supply for voltage sag matters most during load shedding. Corroded terminals on the control board interrupt power intermittently. A failing relay may click but not pass current.
- Loose neutral wire in the ceiling rose
- Faulty transformer on the control board
- Worn contacts on the start relay
Each of these shows a different failure sequence. The garage door motor assembly gives you a pattern, not a random event. Read that pattern carefully and the source narrows itself down.
Replacing the Drive Belt or Chain
A whine from the ceiling often signals a belt or chain past its prime. Replacing either starts with releasing tension from the rail. For a garage door motor assembly, the process demands careful handling. Inspect the old belt for cracking along the teeth. Check chain stretch by lifting it from the sprocket; more than a few millimetres means replacement. Disconnect the power, then loosen the tensioner bolt. Slide the belt off the idler pulley and sprocket, or break the chain at the master link.
Fit the new component by routing it over the cogs and engaging the tensioner. Move the carriage by hand to confirm smooth travel. If the drive strains, realign the rail before restoring power. A garage door motor assembly with a fresh belt or chain should run quietly and without binding after a few test cycles.
Testing the Capacitor
A failing capacitor rarely announces itself with drama. It often presents as a motor that hesitates, hums, or simply refuses to start, even while the lights on the opener function perfectly. Listen for a growl that starts low and climbs. That sound often points to the capacitor struggling to provide the initial torque needed by the garage door motor assembly.
Testing requires a multimeter set to capacitance. First, disconnect the power and locate the cylindrical component near the motor housing. Discharge it safely by shorting the terminals with an insulated screwdriver. Remove the wires and measure across the terminals.
The reading should match the microfarad rating printed on the side. A variance of more than five percent indicates failure. The capacitor may also bulge at the top or leak oil. In South Africa, where power surges are common, this component fails frequently. A simple replacement of the start capacitor often restores full function to a garage door motor assembly that seemed dead.
Essential Maintenance Practices
Lubricating the Moving Parts
Friction robs a garage door motor assembly of its efficiency long before wear becomes visible. In our South African conditions, where dry winters and coastal salt mist coexist, the moving parts demand deliberate care. The rail and trolley interface experiences the most stress.
A dry running motor pulls higher current, which strains the electric motor or heats the unit. Applying a silicone-based lubricant to the rail keeps the surface clean and reduces drag. For the chain drive, a light lithium grease works well to protect the links without flinging off during high speed operation. Check these components regularly:
- Trolley wheel axles for dirt build-up
- Rail surface for old lubricant residue
- Worm gear threads in the motor housing
During the garage door motor assembly, lubricating these points before securing the cover ensures the pulling capacity is directed entirely to the door, not lost to binding friction.
Checking and Tightening Hardware
Vibration performs quiet sabotage on every fastener in a garage door motor assembly. The constant start and stop of the trolley, the torque pulses from the drive gear, all of it conspires to loosen what was once secure. In South African homes, temperature swings make a bolt that felt firm in June rattle by December.
This is why checking and tightening hardware needs a place in your routine. A quick inspection of these points catches trouble early:
- Rail bracket bolts at the header wall
- Motor unit mounting plate screws
- Coupling set screws on the drive shaft
- Emergency release cord anchor fittings
A socket wrench and a steady hand are the right tools. The correct tension is a firm stop, not a groan. Loose hardware in a garage door motor assembly makes the unit sound clattery, and a clattery machine is out of alignment.
Inspecting the Cables and Pulleys
Cables and pulleys carry the weight of the entire door, yet they receive less attention than the motor unit itself. In coastal South African towns, salt air corrodes the strands from the inside out. A frayed cable on a garage door motor assembly does not announce itself until it snaps.
Inspect the cables along their full length, not just the visible lower section. Run a cloth over each wire and feel for snags. Check the pulleys for wear on the groove edges and verify the mounting bolts still hold the brackets flush. The sheave should spin freely, without wobble.
- Cable equalizer bracket tension
- Pulley axle lubrication points
- Wire rope condition near the drums
Listen for creaks during operation and look for uneven winding on the drum. That noise is the first sign of misalignment, and misalignment accelerates wear on every other component in the garage door motor assembly.
Cleaning the Tracks and Rollers
Essential Maintenance Practices: Cleaning the Tracks and Rollers
Ask any technician in Durban or Cape Town and they will tell you the same thing: dirty tracks cause more garage door motor assembly failures than worn gears ever will. Sand and salt residue build up inside the channel, and the rollers grind through it every single cycle.
Here is what to check while cleaning:
- Track alignment where the sections join
- Roller condition, especially the nylon wheels
- Build-up on the track floor and edges
Wipe the full length of the track with a dry rag and run the door manually. Watch the rollers pass each bracket. A roller that hesitates or tilts needs attention. Tap out minor dents with a rubber mallet, but leave serious bends to a professional. Trust me on that one!
The extra friction from a neglected track forces the garage door motor assembly to work harder on every cycle. That strain shortens the life of the motor unit. Clean tracks keep the door moving freely, and that keeps the whole system running without drama.
Testing the Auto-Reverse Safety Feature
I placed a roll of paper towels in the door’s path and pressed the remote. The door stopped and reversed the moment it touched the obstacle. That simple sequence tells you more about the health of your garage door motor assembly than most other checks.
If the door crushes the roll instead of reversing, the system needs attention. Start with the force settings on the control board, then inspect the safety reversing sensors mounted near the floor.
Here is what to look for:
- Sensors that blink instead of holding a steady light
- Brackets that have loosened from vibration
- Dirt or spider webs blocking the infrared beam
A door that cannot reverse is a hazard. The mechanism exists to protect children and pets, and nothing else in the garage door motor assembly carries that same weight.

0 Comments